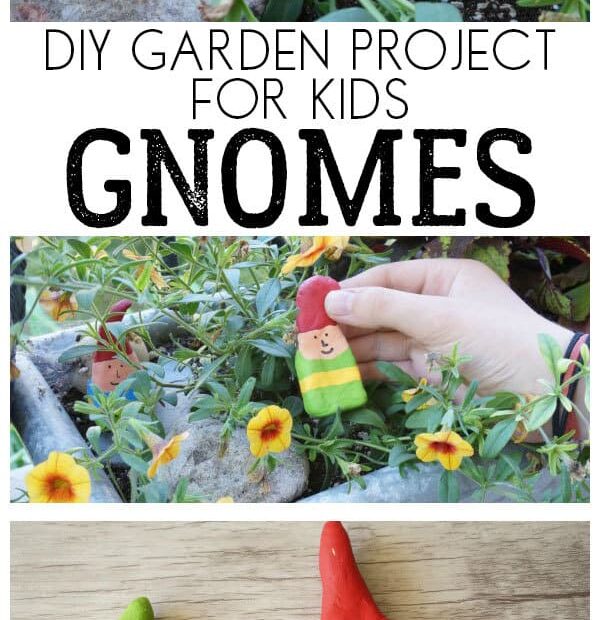
Welcome to the whimsical world of garden gnomes, where magic and mischief come together to breathe life into your outdoor space. If you’ve ever found yourself captivated by these enchanting little creatures as they watch over your flowers and frolic among your shrubs, then you might be thinking it’s time to welcome one into your own garden. But why settle for just any gnome when you can create a personalized masterpiece that reflects your own imagination? In this article, we will delve into the secrets of crafting your very own garden gnome, uncovering the artistry behind their rosy cheeks, pointy hats, and mischievous grins. So prepare your tools, unleash your creativity, and let’s embark on a journey to bring your dreams to life, one gnome at a time.

Choosing the Perfect Materials for Your Garden Gnome
When it comes to creating the perfect garden gnome, the choice of materials is crucial in achieving an enchanting and durable final product. To ensure your gnome stands the test of time and looks absolutely charming in your garden, there are a variety of factors to consider.
Firstly, think about the main body material. Clay is a popular choice, as it allows for intricate details and can be molded into whimsical poses. Another option is resin, which offers durability and is resistant to fading or cracking in various weather conditions. Both materials can be easily painted to bring your gnome to life with vibrant colors.
Next, consider the hat material. A hat made of felt adds a cozy and traditional touch, while one made of ceramic or resin can add a whimsical flair. Don’t forget to select a hat size that complements the gnome’s body proportions.
Moving on to the accessories, opt for durable materials such as metal or resin. These materials will withstand the elements and reduce the risk of breakage. Accentuate your gnome with a pair of sturdy boots, made from weather-resistant materials like rubber or resin, to ensure they stay in place even during wind or rain.
Incorporating additional features can give your gnome a unique personality. For example, add a lantern made from glass to create a warm and inviting atmosphere in your garden. Additionally, consider including a mini birdhouse made of wood or a miniature wheelbarrow made of metal, creating delightful details that will catch the eye.
Loading... Seconds Left for
Miniature Orchid Terrarium Gallery!

Remember, is not only about aesthetics but about durability as well. Consider the climate, maintenance requirements, and overall functionality of the materials you select to ensure your gnome continues to bring joy and charm to your garden for years to come.
| Features |
Tips |
| Choose clay or resin for the main body |
Consider the level of detail and durability you desire |
| Felt or ceramic for the hat |
Match the material to the desired style and weather-resistance |
| Metal or resin for accessories |
Opt for materials that can withstand outdoor conditions |

Mastering the Art of Sculpting and Shaping Your Garden Gnome
Once you’ve decided to add a touch of whimsy to your garden with a charming garden gnome, it’s time to embark on an enchanting journey of sculpting and shaping. With a little patience and a lot of creativity, you can bring your very own gnome to life, adding a delightful element to your outdoor space. In this post, we’ll delve into the artistry and techniques required to master the creation of a garden gnome that will surely make heads turn.
FirstȆ
4; and foremost, gather your materials. You’ll need clay or polymer clay, sculpting tools, and a
sturdy work surface. Begin by envisioning the personality of your gnome – perhaps a mischievous smile or a twinkle in its eye. Start shaping the body of your gnome, carefully adding details such as a rounded belly or chubby cheeks. Remember, there are no rules when it comes to gnome design – let your
imagination run wild! Once you’re satisfied with the overall shape, focus on the facial features. Use a sculpting tool to create the nose, ears, and mouth. Experiment with different expressions until you capture the essence of your gnome’s character. Don’t forget to create a signature hat, as this is an iconic feature of any gnome worth its salt.
To make your gnome even more captivating, consider incorporating some unique features or tips. In a table below, you’ll find three exceptional suggestions to elevate your gnome to the next level of enchantment:
| Feature/Tips |
Description |
| Mushroom Companion |
Add a miniature mushroom, crafted out of clay, to accompany your gnome. This creates a whimsical scene straight out of a fairytale! |
| Glowing Gnome |
For an ethereal touch, embed small LED lights within your gnome’s body. Watch it come alive and illuminate your garden at night. |
| Seasonal Wardrobe |
Craft removable gnome accessories such as hats, scarves, or even miniature gardening tools. Switch up your gnome’s style to match the time of year or your own mood. |
With these tips and tricks in mind, along with your own artistic flair, you’ll be well on your way to mastering the art of sculpting and shaping your very own garden gnome. Embrace the process and let your imagination guide you as you bring this magical creature to life. Get ready to delight in the joy it will bring to your garden – and to the hearts of all who encounter its whimsical presence.

When it comes to adding a touch of charm and whimsy to your garden, there is nothing quite like a garden gnome. These delightful little creatures have been a staple in gardens for centuries, bringing joy and a sense of playfulness to outdoor spaces. If you’ve always wanted to create your own garden gnome masterpiece, now is the perfect time to unleash your creative flair and dive into the world of gnome painting and decorating.
To begin this enchanting journey, start by gathering all the necessary supplies. You’ll need a plain ceramic gnome, acrylic paints in a variety of vibrant colors, paintbrushes in different sizes, and protective sealant. Once you have all your materials at the ready, let your imagination run wild. Feel free to experiment with different patterns, designs, and color combinations. Whether you opt for a classic red-pointy-hat gnome or decide to go bold with a rainbow-hued gnome, the choice is yours.
To ensure your garden gnome stands out and captures everyone’s attention, consider incorporating these features or tips:
<th>Features
| Tips |
| Glitter accents |
Use a fine-tipped brush and a touch of glue to add a sprinkle of magical glitter to your gnome’s hat or clothing. |
| Floral wreaths |
Create a small floral wreath using colorful faux flowers and secure it gently around your gnome’s head for an enchanting twist. |
| Personalized details |
Add a whimsical touch by painting your gnome’s outfit to reflect your hobbies or interests, such as giving it a book or gardening tools. |
Remember, there are no hard and fast rules when it comes to gnome painting. Let your creativity flow, embrace the imperfections, and enjoy the process. Soon enough, you’ll have a unique and captivating garden gnome that will bring endless delight to your outdoor sanctuary. So, grab those brushes, prepare your paints, and embark on this delightful journey of creating your one-of-a-kind garden gnome masterpiece!

Preserving the Charm: Sealing and Protecting Your Garden Gnome
If you’re a proud owner of a whimsical garden gnome, you’ll know the joy it brings to your outdoor space. However, with exposure to the elements, your beloved gnome may start showing signs of wear and tear, losing its vibrant colors and charm. Fear not, for we have compiled a comprehensive guide on how to seal and protect your precious garden gnome, ensuring its longevity and continued allure.
First and foremost, it is essential to choose the right sealant for your gnome. Opt for a high-quality outdoor sealant that is weather-resistant and UV protective. This will shield your gnome from harsh sunlight, rain, and other environmental factors that can cause fading or cracking. Make sure to thoroughly clean your gnome before applying the sealant, as any dirt or debris can interfere with the bonding process. Apply a thin, even layer of sealant using a paintbrush or spray, making sure to cover every nook and cranny. Allow the sealant to dry completely before exposing your gnome to the elements once again.
To further
safeguard your garden gnome, consider these tips and features for long-lasting charm:
| Tips and Features |
Description |
| 1. **Gnome shelter** |
Create a small shelter or place your gnome under a tree or overhang to protect it from direct sunlight and heavy rain. |
| 2. **Periodic touch-ups** |
Inspect your gnome regularly and touch up any areas with fading paint or cracks with paint specifically designed for outdoor use. |
| 3. **Gnome accessories** |
Add adorable accessories like hats, scarves, or even tiny birdhouses to your gnome, ensuring extra protection from the elements while adding a touch of charm. |
By following these sealing techniques and implementing protective measures, you can preserve the magic and beauty of your garden gnome for years to come. Unleash your creativity while safeguarding these delightful creatures and keep them as a timeless centerpiece of your outdoor oasis.
Frequently Asked Questions
Q: How can I transform a ordinary garden into a whimsical wonderland with a delightful garden gnome?
A: With a sprinkle of creativity and a dash of craftiness, you can make your very own enchanting garden gnome! Follow these steps to add a touch of magic to your outdoor oasis.
Q: What sup
plies do I need to bring my garden gnome to life?
A: Grab your imagination and gather these materials: a terracotta clay pot, acrylic paints in vibrant colors, a paintbrush, epoxy adhesive, a wooden dowel, a small piece of foam or felt, and a touch of patience. Once you have all your supplies ready, let’s dive into the gnome-making adventure!
Q: Where do I start to craft my one-of-a-kind gnome companion?
A: First, paint your terracotta pot in a lively shade of your choice, making it the gnome’s cozy little house. Next, paint a charming face and outfit on the clay pot. Once your gnome has a personality, assemble its body by gluing a wooden dowel to the pot, creating sturdy gnome legs. Lastly, fashion a delightful pointed hat from foam or felt, and attach it to the top of the dowel. Your gnome is now complete and ready to add a touch of joy to your garden sanctuary! As we conclude our whimsical journey into the realm of garden gnomes, we hope you’ve been enchanted by these mischievous little guardians of the greenery. Now armed with the knowledge of crafting your very own gnome, you possess the power to sprinkle charm and magic into your garden sanctuary.
Remember, creating a garden gnome is more than just molding clay or carving wood – it’s an invitation to indulge in the delightful world of imagination. As you bring your gnome to life, let your creativity run wild, allowing the individuality of your little guardian to shine through.
Whether you
r gnome is a jolly fellow with a twinkle in his eye or a mischievous imp ready to play pranks, it will undoubtedly bring warmth and joy to your outdoor space. These tiny statues hold the potential to transform your garden into a whimsical haven, where plants flourish and nature thrives under the watchful eyes of your newfound friend.
Embrace the opportunity to breathe life into your garden, for it is within the labor of love that we find solace. As you craft your gnome, take a moment to pause and appreciate the serenity of nature. Allow yourself to reconnect with the earth, find solace in its embrace, and marvel at the beauty that surrounds you.
In the end, your garden gnome will be much more than a mere decoration; it will be a guardian of dreams, a keeper of secrets, and a guardian of tranquility. So go forth, dear readers, and let your creative spirits soar – for the world eagerly awaits the magic that will bloom within your own enchanted garden.
Hello! I'm Jessica Owen, an avid gardener and proud contributor to Up-Gardening.com. Gardening is my passion, and I'm delighted to share my green-thumb experiences with you. From planting tips to nurturing blooms, I'm here to help you cultivate your own slice of paradise. Let's grow together in the garden!
Latest posts by Jessica Owen
(see all)


