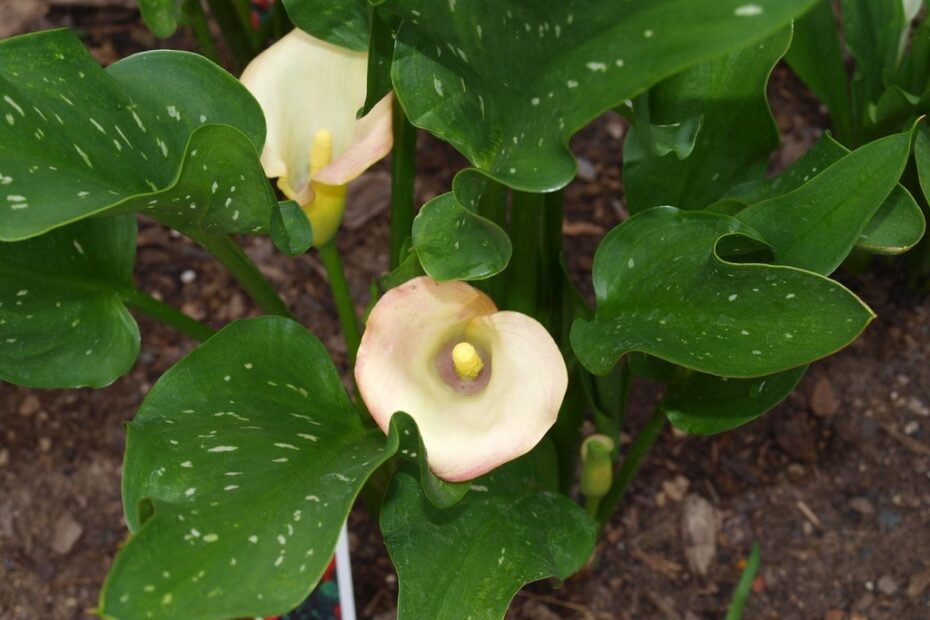
Unveiling nature’s enigmatic masterpiece, the calla lilies epitomize elegance and grace with their captivating form and enchanting aura. These enchanting blooms, adorned with an immaculate white hue or a myriad of vibrant colors, have long mesmerized gardeners and flower enthusiasts alike. However, the time has come when you wish to relocate these delicate darlings amidst your ever-evolving garden tableau, perhaps to a sunnier spot or to accompany new floral companions. Fear not, dear green-thumbed enthusiasts, for today we embark on a whimsical journey of learning—the art of transplanting calla lilies. With every step, we delve deeper into the secrets of nurturing these alluring blossoms, ensuring their seamless transition and continued splendor. So, gather your gardening tools, sprinkle your soil with wonder, and let’s embark on a captivating odyssey of calla lilies and their profound relocation.

Preparing for Transplanting Calla Lilies
For those looking to add a touch of elegance and color to their garden, calla lilies are the perfect choice. These graceful flowers can thrive both indoors and outdoors, and transplanting them allows you to enjoy their beauty in different areas of your garden. Here are some tips to ensure a successful transplanting process.
Choose the Right Timing: The best time to transplant calla lilies is in the spring or fall when the temperatures are moderate. Avoid transplanting them during the heat of summer or in the depths of winter, as extreme temperatures can shock the delicate plants.
Prepare the New Location: Before transplanting, make sure the new location has the right conditions for calla lilies to thrive. They prefer well-draining soil with a slightly acidic pH. Clear away any weeds or grass in the area and dig a hole that is wide and deep enough to comfortably accommodate the rhizome of the calla lily.
| Features | Tips |
|---|---|
| 1. Full Sun Exposure | – Choose a location that receives at least six hours of direct sunlight every day. |
| 2. Adequate Watering | – Water calla lilies regularly, keeping the soil moist but not waterlogged. |
| 3. Fertilizer Application | – Use a balanced fertilizer once a month during the growing season to promote healthy growth. |
By following these steps and taking care of the specific needs of calla lilies, you can ensure a successful transplanting process. Remember to provide them with proper care and watch as these stunning flowers bring a touch of elegance to your garden.


Choosing the Right Location for Transplanting Calla Lilies
When it comes to transplanting calla lilies, choosing the right location is crucial for ensuring their growth and vibrancy. These beautiful flowers, known for their elegant trumpet-shaped blooms, require specific conditions to thrive and reach their full potential. Here are some essential factors to consider when deciding on the perfect spot for your calla lilies:
1. Sunlight Exposure
- Full Sun: Calla lilies generally prefer full sun, which means they should receive at least 6-8 hours of direct sunlight per day. This ample sunlight ensures optimum growth and helps the plants produce abundant blooms.
- Partial Shade: If you live in a hot climate, it’s advisable to provide your calla lilies with some shade during the hottest parts of the day. Partial shade can prevent the plants from overheating and ensure they don’t become stressed.
2. Soil Quality
- Well-Draining: Calla lilies thrive in soil that is well-draining to prevent waterlogging and root rot. Ensure the location has soil that allows excess water to drain away easily, keeping the roots healthy and preventing fungal diseases.
- Organic Matter: Adding organic matter, such as compost or well-rotted manure, to the soil can improve its fertility and drainage properties. This helps create an ideal growing environment for calla lilies.
- Neutral pH: Calla lilies prefer soil with a slightly acidic to neutral pH level, around 6.0-7.0. Testing the soil’s pH and adjusting it accordingly can promote healthier growth and better nutrient absorption for your lilies.
| Features | Tips |
|---|---|
| Ample sunlight | Choose a location with at least 6-8 hours of direct sunlight for optimal growth. |
| Well-draining soil | Ensure the soil allows excess water to drain away easily to avoid waterlogging. |
| Neutral pH soil | Test the soil’s pH and adjust it to be slightly acidic to neutral, around 6.0-7.0. |

Step-by-Step Guide to Transplanting Calla Lilies
Calla lilies, with their elegant trumpet-shaped flowers, can add a touch of grace and beauty to any garden. If you’re looking to give your calla lilies a fresh start or simply rearrange them in your garden, transplanting them is an essential gardening skill. With this step-by-step guide, you’ll be able to successfully transplant your calla lilies and ensure their continued growth and blooming.
Preparing the calla lilies for transplantation is the first crucial step. Start by watering the plants thoroughly a day or two before the transplant. This will help moisten the soil and make it easier to remove the bulbs. Carefully dig up the calla lily bulbs, making sure not to damage the roots. Gently shake off any excess soil to expose the bulb and its roots.
Next, find a suitable location for your calla lilies to thrive. They prefer well-drained soil and partial shade, so choose a spot in your garden that meets these requirements. Dig a hole that is slightly larger than the bulb and place the calla lily bulb in the hole, making sure the pointed end is facing upwards. Cover the bulb with soil, ensuring it is secure but not packed tightly. Water the transplanted bulb immediately after planting to help settle the soil and provide some moisture for the new roots.
To ensure the success of your calla lily transplantation, here are some useful features and tips to keep in mind:
| Features/Tips | |
|---|---|
| Choose the right time | Transplant calla lilies during their dormant period in spring for the best results. |
| Maintain adequate spacing | Leave around 12-18 inches of space between each calla lily bulb to allow room for growth and prevent overcrowding. |
| Fertilize appropriately | Apply a balanced, slow-release fertilizer to provide essential nutrients to your calla lilies throughout the growing season. |
With these steps and tips, you’ll be well-equipped to successfully transplant your calla lilies and create a beautiful garden that showcases their splendor. Remember, patience and care are key in ensuring the continued growth and blooming of these magnificent flowers. Happy transplanting!

Tips for Ensuring Successful Transplantation of Calla Lilies
How to Transplant Calla Lilies
Are you eager to bring the beauty of calla lilies to a new corner of your garden? Transplanting these luscious flowers can be a rewarding endeavor if done correctly. To ensure successful transplantation, here are some expert tips that will help your calla lilies thrive in their new environment.
First and foremost, timing is crucial when it comes to moving calla lilies. Wait until after the last frost in spring or early autumn to transplant these delicate beauties. Choose a location that offers partial shade, as calla lilies prefer a balance between sunlight and shade. When preparing the soil, mix in organic matter such as compost to provide the lilies with the nutrients they need to flourish. Dig a hole that is deep enough to accommodate the entire root system of the plant, ensuring the crown sits just below the soil surface. Once the calla lily is in its new spot, gently pat the soil around the base and water thoroughly.
Now, let’s explore some features and tips that will help you optimize the transplantation process.
| Features | Tips |
|---|---|
| Blooming period | Transplant the calla lilies during their dormant period, either in spring or autumn. |
| Soil requirements | Ensure the soil is well-draining and enriched with organic matter to promote healthy growth. |
| Watering | Maintain a consistent level of moisture, allowing the soil to dry out slightly between watering. |
Remember, calla lilies are resilient plants, but they thrive when given the right conditions. By following these tips and taking care during the transplantation process, you can enjoy the stunning beauty of calla lilies for years to come. Be patient, show them some love, and watch these elegant flowers put on a show in your garden.
Frequently Asked Questions
Q: How can I transplant calla lilies without breaking their delicate stems?
A: Picture this: Perform a dramatic rescue mission by carefully digging around the roots, scooping up the entire plant with sizable soil clump intact. Gently place it in its new home and shower it with water. Just like a superhero, let these lilies thrive and bloom!
Q: Can calla lilies tolerate being uprooted from their cozy beds?
A: Fear not, for calla lilies are the daredevils of the flower world! With a little bit of TLC, they can handle the excitement of being transplanted. Give them a new patch of soil, some sunlight, and watch them flourish in their new digs.
Q: How long will it take for my transplanted calla lilies to settle into their new surroundings?
A: Ah, the waiting game. Patience is the virtue here, my friend. Give these charming beauties a few weeks to adjust to their new environment. Like a shy introvert at a party, they’ll need some time to feel at ease and begin showing off their magnificent blooms. As we gently bid adieu to this guide on transplanting calla lilies, we find ourselves in awe of the beauty and resilience of these captivating flowers. Just like the delicate dance of a moonlit ball, the process of transplanting calla lilies requires grace, patience, and a touch of finesse.
As you embark on this horticultural journey, remember to honor these majestic blooms by ensuring they receive the care and attention they deserve. Whether you choose to move them to a new garden bed or a decorative container, the steps outlined in this article will empower you to become a transplanting virtuoso.
With your newfound knowledge, witness the graceful transition of calla lilies, as they thrive in their new abode, seducing the eyes of all passersby. While their care may seem daunting at first, fear not, for cultivating calla lilies is like sowing seeds of magic and reaping abundant rewards.
As you delve into the world of calla lily transplantation, let patience be your companion and curiosity be your guide. Allow yourself to marvel at the wonders of nature as you witness these elegant flowers adapt, grow, and captivate the very essence of their surroundings.
Remember, dear reader, that your touch has the power to transform, to nurture, and to ignite the flame of life within these delicate petals. As you embark on this journey, tend to their needs, for in return, they shall offer you a magnificent symphony of colors and a fragrance that lingers in the air long after the last sunbeam has faded.
So, go forth, intrepid gardener, armed with the knowledge embedded within these pages. Embrace the art of calla lily transplantation, and may your fingertips guide these extraordinary flowers to new horizons, where their beauty shall flourish, and your green thumb shall forever be applauded.

- When to Put Weed and Feed on Lawn in Michigan - October 16, 2023
- When to Fertilize Potatoes Plants - October 16, 2023
- Can You Plant Clover in the Spring - October 16, 2023