Revving up the buzzing engines, the sharp rumble of lawn mowers echoes through the tranquil landscapes. As the sun-drenched lawns beckon for attention, the efficiency of a trusty mower becomes paramount. However, what happens when that quintessential part of the mower, the starter, gives you a sullen twist of fate? Fear not, for in this article, we shall embark on a journey to demystify the perplexing world of testing your lawn mower starter. Unyielding in our commitment to unravel its secrets, we shall guide you through a step-by-step process, equipping you with the knowledge and tools necessary to determine the fate of your mower’s heart. Cast aside your worries, as we rev up our engines of wisdom, exploring the uncharted realms of starter testing, ensuring that your precious lawns remain immaculate and vibrant.

1. Understanding the Basics: A Step-by-Step Guide to Testing Your Lawn Mower Starter
In order to ensure a smoothly running lawn mower, it is essential to periodically check and test the starter. Luckily, testing your lawn mower starter is a simple process that you can perform yourself with just a few basic tools. Follow this step-by-step guide to quickly identify any issues with your lawn mower starter and get back to maintaining your pristine lawn in no time.
First, gather the necessary tools for the job, which are likely to include a voltmeter, wire brush, and safety gloves. Before starting the test, always remember to disconnect the battery to prevent any accidents. Begin by examining the starter components for any signs of damage or corrosion. If there is corrosion present, gently clean it off using a wire brush to ensure proper connection. Next, connect the voltmeter to the starter terminal, ensuring it is set to the voltage setting. With a helper present, engage the starter switch and carefully observe the voltmeter reading. A reading within the recommended range indicates a functioning starter, while a zero or significantly low reading may suggest a faulty starter or electrical issue.
To make your testing process even more effective, consider the following features and tips:
| Features/Tips | |
|---|---|
| Visual Inspection | Thoroughly examine the starter for any signs of damage, such as frayed wires or loose connections. |
| Cleaning and Lubrication | Regularly clean and lubricate the starter components to prevent rust and ensure smooth operation. |
| Battery Check | Always check the condition of the battery and its connections before testing the starter, as a faulty battery can often be the culprit. |
By following these simple steps and utilizing the suggested features and tips for testing your lawn mower starter, you’ll be able to diagnose and address any issues efficiently. Remember, a well-maintained starter is the key to keeping your lawn mower running at its best, allowing you to effortlessly maintain and showcase your beautiful outdoor space.


2. Identifying Common Starter Issues: Troubleshooting Tips and Tricks
Introduction
In order to keep your lawn mower running smoothly, it is essential to ensure that the starter is in good working condition. A faulty starter can prevent your mower from starting, making it frustrating and time-consuming to tackle your lawn care tasks. In this post, we will provide you with effective troubleshooting tips and tricks to test your lawn mower starter and identify common issues that may be preventing it from functioning properly.
Troubleshooting Tips and Tricks
When it comes to testing a lawn mower starter, there are several key steps you can follow to diagnose any potential problems. These troubleshooting tips and tricks will aid you in identifying the issue and determine what steps need to be taken for repair:
| Features | Tips |
|---|---|
| Solenoid Connection Check | Verify that the solenoid, which connects the starter to the battery, is securely attached and not loose. A loose connection can impact the starter’s functionality and lead to starting problems. |
| Battery Testing | Ensure that the battery has sufficient charge and is capable of providing enough power to the starter motor. Use a multimeter to measure the battery voltage and make sure it meets the recommended specifications for your lawn mower. |
| Starter Gear Inspection | Check the starter gear for any signs of wear or damage. If the gear is worn out, it may not engage properly with the flywheel, resulting in a failure to start. Replace the gear if necessary. |
By performing these troubleshooting steps, you can quickly identify the common starter issues that may be affecting your lawn mower’s performance. Remember to consult your mower’s manual for specific instructions and safety precautions before attempting any repairs or replacements. With persistence and thorough testing, you’ll be able to keep your lawn mower’s starter in optimal condition, ensuring a hassle-free mowing experience every time.

3. Testing the Starter: Proven Methods to Assess Performance and Ensure Optimal Functionality
When it comes to maintaining a well-functioning lawn mower, testing the starter is essential to ensure a hassle-free experience and optimal performance. Here are some tried and tested methods that will help you evaluate the functionality of your lawn mower starter:
Visual Inspection:
- Start by examining the starter for any visible signs of damage, such as frayed wires or loose connections.
- Inspect the starter assembly for corrosion or rust, as these can hinder its proper functioning.
- Check if the starter’s gear teeth are worn out. If they are, it may be time to replace the starter.
Battery Test:
- Ensure that the battery is fully charged before starting the testing process.
- Use a multimeter to measure the voltage across the battery terminals. If the reading is below the manufacturer’s recommendation, consider replacing the battery.
- Check the battery terminals for any signs of corrosion. Clean them thoroughly to ensure a good connection.
| Features | Tips |
|---|---|
| Easy visual inspection | Regularly check the starter for any signs of damage or wear |
| Battery test | Ensure the battery is fully charged and the terminals are clean |
| Benchmark tests | Perform bench tests to evaluate the starter’s performance under load |

4. Expert Recommendations: Maintaining and Upgrading Your Lawn Mower Starter for Longevity and Efficiency
When it comes to maintaining and upgrading your lawn mower starter, expert recommendations can make all the difference in ensuring longevity and efficiency. Keeping your starter in optimal condition is crucial for a smooth and hassle-free mowing experience. Here are some invaluable tips to help you test your lawn mower starter.
Firstly, check the battery voltage using a multimeter. A fully charged battery should read around 12.6 volts. If your reading is significantly lower than this, it’s a clear indication that your battery needs charging or replacing. Next, inspect the starter solenoid, a small cylinder-shaped component located near the battery. Ensure that the wires are tightly connected, clean, and free from corrosion. Corroded connections can impede the flow of electricity, leading to a weak or non-functioning starter. Additionally, a visually damaged solenoid may require replacement.
| Features | Tips |
|---|---|
|
|
|
|
|
|
Frequently Asked Questions
Q: Why won’t my lawn mower starter engage when I try to start it?
A: Ah, the amusing escapades of our beloved lawn mower starters! Fear not, for I have the tricks up my sleeve to help you diagnose and test this stubborn contraption. Let’s unravel this enigma together, shall we?
Q: How can I check if the starter solenoid is the culprit?
A: Now, don your detective hat, my dear grass enthusiast, as we uncover the truth behind your mischievous starter solenoid. Take a multimeter, set it to a resistance or continuity setting, and carefully connect the test leads to the solenoid terminals. If you hear a lonely beep or see a resistance reading that is out of this world, you might have just found the sneaky saboteur.
Q: Is there a simple way to examine the starter motor for any shady behavior?
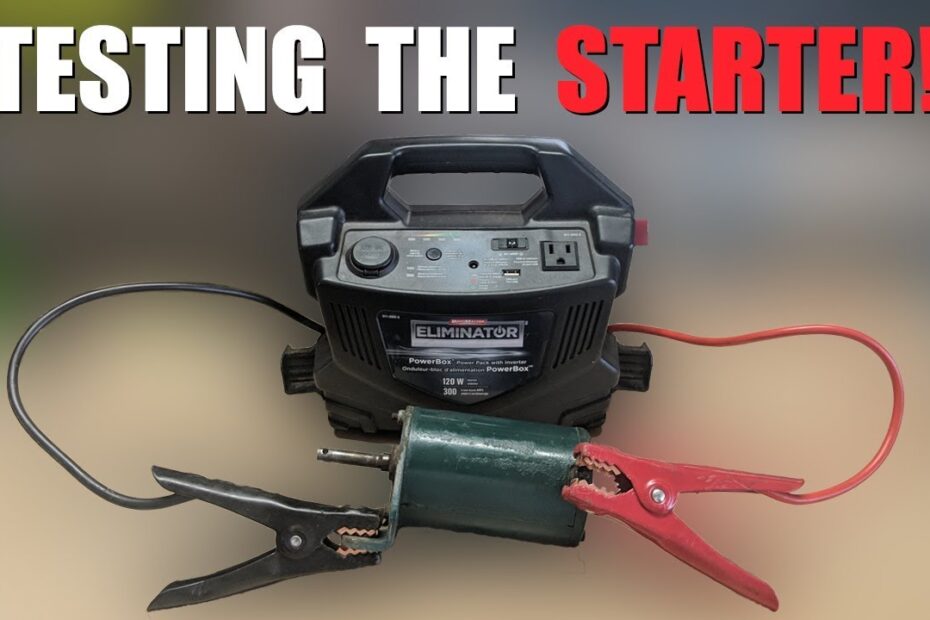
A: Ah, the starter motor, the unsung hero of our mighty mowers! Weary not, for I will acquaint thee with a great technique to unleash its secrets. First, disconnect the spark plug wire to keep things safe and sound. Next, grab a trusty automotive battery and some heavy-duty jumper cables. Connect one cable end to the starter motor’s positive terminal and the other to the battery’s positive terminal. Then, complete this electrifying ensemble by attaching one end of the second jumper cable to the starter motor’s negative terminal and the other to the battery’s negative terminal. If you hear a symphony of buzzing from the starter motor, dear friend, rejoice! The motor’s vitality remains intact.
Now, my eager grass-conqueror, armed with these wondrous testing know-hows, you shall tame the finicky starter and restore harmony in your lush domain once more! As we bid adieu to this guide on testing lawn mower starters, we hope it has sparked a newfound confidence within you to troubleshoot and diagnose any potential issues. Remember, the humble starter holds the key to an immaculate mowing experience—the catalyst that sets your lawn mower’s engine into motion.
With our creative testing methods in tow, you’re now armed with the expertise to decipher the enigmatic secrets of your machine’s starting mechanism. As you embark on your lawn mowing endeavors, let this knowledge be your compass, guiding you towards victory over stubborn starting problems.
But tread cautiously, dear reader, for handling these delicate components requires finesse and finesse alone. Treat your lawn mower’s starter with the reverence it deserves, and it shall repay you with countless starts, each one more effortless than the last.
So, when faced with a mutinous starter that refuses to awaken your lawn mower’s dormant power, do not despair. Consult this guide, trust your instincts, and embark on a journey of discovery. With diligent testing, patience, and perhaps a sprinkle of creative brilliance, you hold the key to breathe life back into your once-slumbering machine.
Now, go forth, fellow green enthusiasts, and fearlessly explore the inner workings of your lawn mower’s heart. May your starts be swift, your blades be sharp, and your lawns be the epitome of verdant perfection. Farewell, and happy mowing!

- When to Put Weed and Feed on Lawn in Michigan - October 16, 2023
- When to Fertilize Potatoes Plants - October 16, 2023
- Can You Plant Clover in the Spring - October 16, 2023
Contents
- 1 1. Understanding the Basics: A Step-by-Step Guide to Testing Your Lawn Mower Starter
- 2 2. Identifying Common Starter Issues: Troubleshooting Tips and Tricks
- 3 3. Testing the Starter: Proven Methods to Assess Performance and Ensure Optimal Functionality
- 4 4. Expert Recommendations: Maintaining and Upgrading Your Lawn Mower Starter for Longevity and Efficiency
- 5 Frequently Asked Questions