Unleash your inner grass guru and dive into a world where lawn mower maintenance becomes an art form. Picture this: you wake up on a sunny Saturday morning, eager to groom your sprawling yard into a picturesque wonderland. As you reach for the trusty ignition switch of your beloved grass-disheveling companion, a dreaded silence fills the air. Fear not, dear reader, for today we embark on an enlightening journey to demystify the enigmatic solenoid. Equipped with just your trusted multimeter and a hint of curiosity, we shall unravel the secrets of testing this elusive device. So roll up your sleeves, grab that multimeter with gusto, and let us dive headfirst into the world of lawn mower solenoids. Get ready to revive your yard-taming partner and unleash waves of verdant glory upon your green kingdom!
Troubleshooting Your Lawn Mower: Testing the Solenoid with a Multimeter
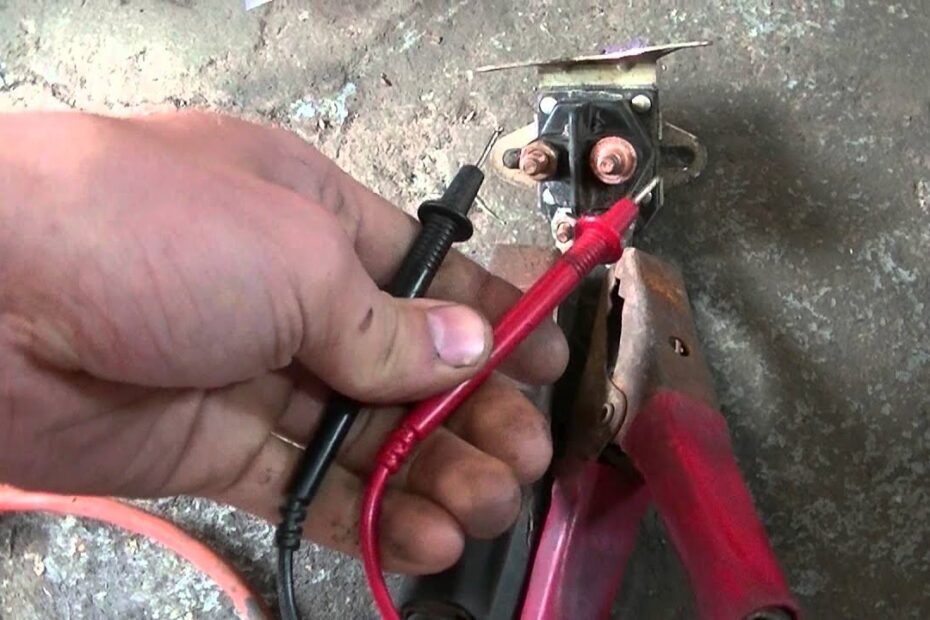
In order to troubleshoot your lawn mower effectively, it is important to test the solenoid using a multimeter. This handy tool can help you identify any issues with the solenoid, allowing you to address the problem and get your mower up and running smoothly again. Testing the solenoid with a multimeter is a simple process that can be done by following a few steps.
First, you will need to gather the necessary tools, including a multimeter and safety goggles. It is crucial to prioritize safety when working with any electrical components, so make sure to wear your safety goggles at all times. Once you have the tools ready, locate the solenoid on your lawn mower. It is usually situated near the starter motor or ignition switch.
Next, set your multimeter to the “Ohms” setting, which measures electrical resistance. Attach the multimeter leads to the terminals on the solenoid. The positive lead, usually marked with a plus sign or a red color, should be connected to the battery terminal marked with a plus sign. The negative lead, on the other hand, should be connected to the solenoid terminal that connects to the starter motor or ignition switch. Once properly connected, read the resistance value displayed on the multimeter. A healthy solenoid should have a resistance between 10 and 15 ohms. If the readings are outside of this range, it indicates a faulty solenoid that needs to be replaced.
To make troubleshooting your lawn mower even more effective, here are some features or tips to consider:
Table:

| Feature/Tips | Details |
|---|---|
| Regular maintenance | Perform routine maintenance tasks such as changing the oil, cleaning or replacing the air filter, and sharpening the mower blades. |
| Fuel management | Properly manage and treat the fuel in your lawn mower to prevent clogs and keep the engine running smoothly. |
| Check spark plug | Periodically inspect and clean or replace the spark plug to ensure a strong and consistent spark for ignition. |
By employing these features or tips, in addition to testing the solenoid with a multimeter, you can effectively troubleshoot and maintain your lawn mower, ensuring it operates at its best all season long. Remember to always prioritize safety and consult the manufacturer’s manual or a professional if you encounter any issues you are unsure about. Happy mowing!

Unveiling the Importance of a Solenoid in Your Lawn Mower
When it comes to keeping your lawn beautiful and well-manicured, a solenoid in your lawn mower plays a vital role that often goes unnoticed. This small yet powerful device acts as the gateway between the electrical system and the engine, allowing for the seamless operation of your lawn mower. Understanding the importance of the solenoid and knowing how to test it using a multimeter can save you time, money, and frustrations in the long run.
Testing your lawn mower solenoid with a multimeter is a straightforward process that can help troubleshoot any issues and ensure its proper functioning. To begin testing, follow these steps:
- Prepare the multimeter: Set the multimeter to the resistance or ohm setting and ensure it is functioning correctly.
- Locate the solenoid: The solenoid is typically situated near the battery or starter motor and can be identified as a cylindrical device with terminals.
- Disconnect the wires: Remove the wires connected to the solenoid to avoid any interference during the testing process.
- Test the solenoid: Place the multimeter probes on the two main terminals of the solenoid and check for continuity or resistance readings between 5 and 10 ohms.
To help you further understand the features and tips related to lawn mower solenoids, refer to the table below:
| Features | Tips |
|---|---|
| Durable construction | Regularly clean and inspect |
| Efficient electrical flow | Replace solenoid if damaged |
| Easy installation | Lubricate moving parts |
By embracing the significance of a solenoid and learning how to test it using a multimeter, you can ensure the smooth running of your lawn mower. Regular maintenance, inspections, and understanding the intricacies of this crucial component will contribute to the longevity of your mower, allowing you to effortlessly achieve that picture-perfect lawn you desire.
Step-by-Step Guide: Testing the Solenoid of Your Lawn Mower Using a Multimeter
Testing the solenoid of your lawn mower is a crucial step in diagnosing any starting issues or electrical problems. By using a multimeter, you can easily determine whether the solenoid is functioning properly or if it needs to be replaced. Here is a step-by-step guide to help you test your lawn mower solenoid using a multimeter.
First, disconnect the spark plug wire from the spark plug to ensure your safety. Locate the solenoid on your lawn mower, which is usually near the battery or starter. Next, set your multimeter to the “Ohms” setting. Connect the black lead of the multimeter to the ground terminal of the solenoid, and the red lead to the positive terminal. If the multimeter reads zero or a very low value, it indicates a short circuit in the solenoid. On the other hand, if the multimeter does not show any reading or the value is extremely high, it signifies an open circuit. In both cases, it is time to replace the solenoid.
In addition to testing the solenoid, here are some extra features and tips that can help you with your lawn mower maintenance:
- Regularly clean the solenoid to prevent any debris from affecting its performance.
- Check for any loose connections or damaged wiring around the solenoid and fix them promptly.
- For accurate test results, ensure that your multimeter is properly calibrated and functioning correctly.
- If you are unsure about any steps or do not feel confident in performing the test, consult a professional for assistance.
By following these step-by-step instructions and using a multimeter, you can easily test the solenoid of your lawn mower and ensure its proper functioning. Remember to prioritize safety while working with electrical components and seek professional help if needed. A well-maintained solenoid will keep your lawn mower running smoothly, allowing you to maintain a perfectly manicured lawn without any starting issues.
Ensuring Optimal Performance: Tips for Testing and Maintaining Your Lawn Mower’s Solenoid
When it comes to keeping your lawn mower running smoothly, one component that often goes overlooked is the solenoid. This small but vital part is responsible for connecting your battery to the starter motor, allowing your mower to start and run efficiently. To ensure your lawn mower is performing at its best, it is important to regularly test and maintain the solenoid. With the help of a multimeter, you can easily diagnose any issues and take the necessary steps to fix them. In this post, we will guide you on how to test your lawn mower’s solenoid using a multimeter.
How to Test Your Lawn Mower Solenoid with a Multimeter
To begin testing your lawn mower solenoid, follow these simple steps:
- Ensure your mower is turned off and the key is removed from the ignition to prevent any accidental starts or injury.
- Locate the solenoid, typically found near the battery or starter motor. It is a cylindrical-shaped component with two large terminals and sometimes a smaller terminal or wire.
- Set up your multimeter to measure continuity (ohms) and insert the test leads into the appropriate ports.
- Connect one test lead to the terminal on the solenoid that is connected to the ignition switch and the other lead to the terminal connected to the starter motor/wire.
- Turn on the multimeter and check for continuity by touching the test leads together. If you hear a beep or see a low resistance reading, it means the solenoid is functioning properly.
- If there is no continuity or a significantly high resistance reading, it indicates a faulty solenoid that needs to be replaced.
Testing your lawn mower’s solenoid regularly is crucial for identifying any potential issues and ensuring the proper functioning of your mower. By following these simple steps and using a multimeter, you can easily determine if your solenoid is in good condition or if it needs to be replaced. Remember to always refer to your mower’s manual and take proper safety precautions when working with electrical components.
| Features/Tips | Description |
|---|---|
| Regular Maintenance | Perform routine checks and clean the solenoid contacts to prevent corrosion and ensure optimal performance. |
| Inspect Wires | Check the wiring connections to the solenoid for any signs of damage or loose connections that may affect its functionality. |
| Apply Dielectric Grease | Using dielectric grease on the solenoid connections can help protect against moisture and enhance electrical conductivity. |
Frequently Asked Questions
Q: What’s the buzz about testing a lawn mower solenoid with a multimeter?
A: Are you tired of your lawn mower refusing to start? Don’t fret! Testing the solenoid with a multimeter might just be the answer you’ve been looking for.
Q: How can I test my lawn mower solenoid using a multimeter?
A: Ah, the secret lies in a trusty multimeter! First, disconnect the battery cables for safety. Then, set your multimeter to the ohmmeter function and connect its leads to the solenoid terminals. If the multimeter displays a reading close to zero ohms, rejoice, as your solenoid is likely functioning perfectly. However, if it shows infinite resistance, it’s time to bid adieu to that faulty solenoid.
Q: What are the signs that my lawn mower solenoid might need testing?
A: Ah, grasshopper, keep an eye out for a few red flags. If your trusty mower refuses to start, makes a clicking sound, or fails to engage the starter motor, it’s high time you put that multimeter to work. Don’t let your lawn suffer due to a misbehaving solenoid. Test away, and let your grass breathe a sigh of relief! As we bid farewell to our exploration of how to test a lawn mower solenoid with a trusty multimeter, it’s time to reflect upon the knowledge we’ve acquired. We embarked on a journey, seeking not only the secrets hidden within the solenoid’s intricate circuitry but also a deeper understanding of the delicate balance that resides within the green realm of our beloved lawns.
Like a symphony conductor, the solenoid orchestrates the harmonious symphony of energy that breathes life into our mechanical grass quellers. With a simple flick of the ignition switch, it awakens and diligently transfers electrical currents, beckoning the engine to life amidst the emerald blades.
Our trusty multimeter, our steadfast companion throughout this intricate dance of diagnosis, proved to be an invaluable tool on this quest. With its unwavering precision, we were able to unearth the hidden truths, separating the faulty from the steadfast solenoids with a mere touch of its probing metallic fingers.
Amidst the tapestry of knowledge we’ve woven together, we discovered that our multimeter could unveil the secrets of solenoid resistance, assuring that our electrical warriors stood strong. We learned to measure insulation resistance, ensuring that no current dared to stray where it shouldn’t, preventing misfires and unforeseen chaos.
But let us not part today without reminding ourselves that testing a lawn mower solenoid is not solely a technical endeavor. It is a testament to our dedication as custodians of nature’s green canvas, a way to honor the silent guardians that lie beneath the hum of the motor.
As we pack our multimeters away, let us embark on our next grassy adventure with newfound confidence. Armed with knowledge, we can conquer the unruly overgrowth, transforming our lawns into idyllic sanctuaries of tranquility.
And so, dear reader, we bid you adieu on this journey of solenoid exploration. May your lawn mowers roar to life with joyous vigor, and may the multimeter always be at your side, guiding you through the labyrinthine world of electrical diagnosis. Until we meet again, may your lawns be evergreen and your solenoids always shine brightly in the face of adversity.

- When to Put Weed and Feed on Lawn in Michigan - October 16, 2023
- When to Fertilize Potatoes Plants - October 16, 2023
- Can You Plant Clover in the Spring - October 16, 2023
Contents
- 1 Troubleshooting Your Lawn Mower: Testing the Solenoid with a Multimeter
- 2 Unveiling the Importance of a Solenoid in Your Lawn Mower
- 3 Step-by-Step Guide: Testing the Solenoid of Your Lawn Mower Using a Multimeter
- 4 Ensuring Optimal Performance: Tips for Testing and Maintaining Your Lawn Mower’s Solenoid
- 5 Frequently Asked Questions