Unveiling the Secret Terrarium: A Universe Enclosed within the Mower’s Belly
Nestled in the lush emerald landscapes of our gardens lies a powerful guardian, known by many as the lawn mower. This mighty machine, with its spinning blades and relentless determination, ensures our lawns remain meticulously trimmed, revealing a neatly-crafted green carpet. But what happens when this formidable hero refuses to awaken from its slumber? Fear not, dear horticulturists, for today we embark on a journey into the depths of this enigmatic engine enclosure, unlocking the hidden secrets of the lawn mower starter. In this guide, we will explore the intricacies of this vital component, unravel the mysteries that lie beneath its metallic shell, and equip you with the know-how to successfully test a lawn mower starter. So, don your exploratory gear, buckle up, and prepare to dive into the enchanting realm of starters and sparkles, where the magic begins.
Checking the battery for power output
To ensure that your lawn mower starter is functioning properly, it is essential to check the battery for power output. A simple test can help identify if the battery is delivering enough power to start the mower efficiently. Here are some steps to follow when conducting this test:
First, gather the necessary tools: a voltmeter and safety gloves. With the voltmeter set to the DC voltage setting, connect the positive lead to the positive terminal of the battery. Then, connect the negative lead to the negative terminal. Make sure the connections are secure and the voltmeter is displaying zero volts before proceeding.
Next, engage the starter by turning the ignition key or pushing the start button. Observe the voltmeter reading, and it should display a voltage between 24 and 30 volts if the battery is in good condition. If there is no reading or a significantly lower voltage, it indicates a weak or faulty battery. In this case, it is advisable to replace the battery with a new one.
Aside from testing the battery itself, there are a few other features and tips to consider when troubleshooting a lawn mower starter. Below is a table highlighting some essential points:

| Features/Tips | Explanation |
|---|---|
| Corrosion on Battery Terminals | Inspect and clean any corrosion on the battery terminals, as it can hinder power flow. |
| Wiring Connections | Check the wiring connections between the battery, starter, and ignition system to ensure they are secure and intact. |
| Starter Solenoid | Test the starter solenoid with a multimeter to determine if it is functioning correctly, as a faulty solenoid can prevent the mower from starting. |
By following these steps and considering other important features or tips, you can effectively diagnose and troubleshoot any issues with your lawn mower starter. Remember to prioritize safety and consult a professional if needed. Keen maintenance of your starter will help ensure a pleasant mowing experience and keep your lawn looking its best.

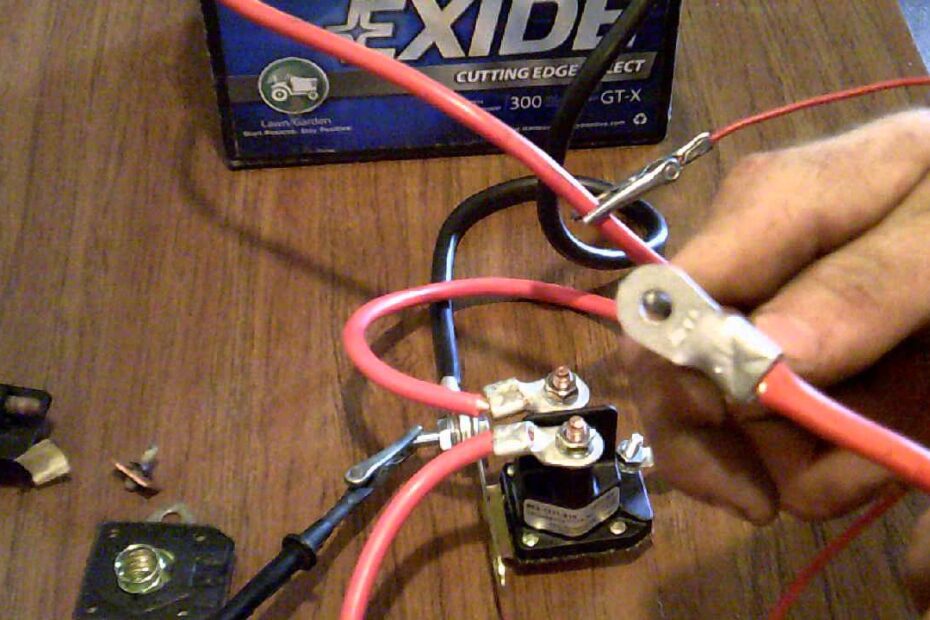
Inspecting the starter solenoid and wiring
The starter solenoid and wiring of a lawn mower are crucial components that must be in top condition for the machine to start smoothly. To ensure everything is working correctly, it is essential to inspect these elements regularly. By carefully examining the starter solenoid and wiring, you can identify any potential issues and take the appropriate steps to fix them. Here are some tips and features to consider:
Features and Tips:
| Visual Inspection | Testing for Continuity |
| Look for any signs of corrosion or damage on the starter solenoid and wiring. | Using a multimeter, check the continuity of the wiring to ensure there are no breaks or faulty connections. |
| Ensure the wires are securely attached to the solenoid terminals, and there are no loose or frayed ends. | Test the solenoid by applying voltage to the control terminal and listening for a click indicating proper functioning. |
Inspecting these components regularly can save you from any unexpected starting issues while maintaining the overall performance of your lawn mower. Remember to follow safety precautions, such as disconnecting the battery and wearing protective gloves, when carrying out any maintenance tasks. By keeping an eye on the starter solenoid and wiring, you can ensure a smooth start every time you mow your lawn.
Examining the ignition switch and key
When it comes to testing a lawn mower starter, one of the key areas to examine is the ignition switch and key. These components play a vital role in starting the mower’s engine, so it’s crucial to ensure they are functioning properly. Here are a few features and tips to consider:
| Features: | Tips: |
|---|---|
| 1. Ignition Key Lock | 1. Inspect the key for any damage or wear that may prevent it from turning smoothly. |
| 2. Ignition Switch | 2. Check the switch for any signs of corrosion or loose connections that could hinder its functionality. |
| 3. Starter Solenoid | 3. Test the solenoid to ensure it is engaging properly when the ignition key is turned. |
By carefully , you can troubleshoot potential issues and ensure a smooth start for your lawn mower. Don’t overlook these crucial components, as a faulty ignition system can cause frustrating starting problems. Take the time to inspect, test, and maintain these parts regularly to keep your mower running at its best.

Cleaning and troubleshooting the spark plug
When it comes to keeping your lawn mower in top shape, one crucial component that often requires attention is the spark plug. A spark plug plays a vital role in starting the engine by providing a spark to ignite the fuel and air mixture. Over time, spark plugs can become dirty or wear out, leading to issues such as difficulty starting the engine or poor performance. To ensure your lawn mower is always ready for action, follow these steps to clean and troubleshoot the spark plug:
Cleaning the Spark Plug:
- Step 1: Disconnect the spark plug wire from the plug itself to prevent accidental starting.
- Step 2: Use a socket wrench or spark plug socket to remove the spark plug from the engine.
- Step 3: Inspect the spark plug for any signs of dirt, debris, or carbon deposits. If you notice buildup, use a wire brush or a plug cleaner to gently remove it.
Troubleshooting the Spark Plug:
- Step 1: Examine the spark plug for any cracks, damage, or wear on the electrode. If you detect any issues, it’s best to replace the spark plug with a new one.
- Step 2: Check the spark plug gap using a feeler gauge. The gap should match the manufacturer’s specifications. If it’s too wide or too narrow, carefully adjust it using a gap tool.
- Step 3: Reinstall the spark plug by hand and then use the socket wrench or spark plug socket to tighten it securely but not overly tight. Reconnect the spark plug wire to complete the cleaning and troubleshooting process.
Spark Plug Cleaning and Troubleshooting Tips:
| Feature/Tips | Description |
|---|---|
| Regular Maintenance | Performing spark plug cleaning and troubleshooting regularly ensures optimal lawn mower performance and prevents ignition problems. |
| Replace if Necessary | If your spark plug is damaged, worn out, or beyond cleaning, it’s crucial to replace it with a compatible new one to avoid further issues. |
| Use Genuine Parts | Always use genuine spark plugs recommended by the manufacturer for your specific lawn mower model to guarantee compatibility and performance. |
Frequently Asked Questions
Q: Is it possible to test a lawn mower starter if it refuses to crank?
A: Absolutely! Testing a lawn mower starter can help identify the root cause of why it’s refusing to crank, saving you the time and money of replacing unnecessary parts.
Q: What tools do I need to test a lawn mower starter?
A: Prepare yourself with a multimeter (a handy device used for measuring electrical current), a clean rag, a wrench or socket set, and a pair of safety goggles. It’s always better to be safe than sorry!
Q: How can I check if the starter solenoid is functioning properly?
A: To check the starter solenoid, first, locate it on your lawn mower – it’s usually found near the battery. Put on your safety goggles and clean any dirt or grime around the solenoid using a rag. Then, using the multimeter set to “Ohms,” touch one probe to the solenoid’s small terminal and the other probe to its housing. If the meter reads zero ohms, congratulations! Your solenoid is working well. If it displays any other value, it’s time to replace it. Remember, safety first! As we bring this article to a close, we hope you’ve found our guide on how to test a lawn mower starter both enlightening and useful. Harnessing the power of your green machine doesn’t have to remain a mystery, and with a little patience and know-how, you can troubleshoot and diagnose issues with your starter like a seasoned pro. Remember, when it comes to a smoothly running lawn mower, the starter is the unsung hero that kickstarts your gardening adventures. Dedicating some time to understanding its inner workings will undoubtedly pay off in the long run, saving you money and keeping your lawn beautifully manicured all season long.
With our step-by-step instructions, you’re now armed with the knowledge to evaluate the health of your starter, identify any glitches, and take the necessary corrective measures. Always approach the testing process with caution, ensuring your safety and that of your equipment. Remember, depending on your lawn mower model or specific circumstances, some steps might differ, so consult your user manual for precise instructions if needed.
So, put on your detective hat, grab your trusty multimeter, and embark on this troubleshooting journey. Discovering the hidden causes behind an unresponsive starter can provide a sense of accomplishment and empower you as a mower maestro. As you delve deeper into your lawn mower’s mechanisms, you’ll gain a newfound appreciation for the intricate symphony of gears, pistons, and spark plugs working harmoniously behind the scenes.
Now you’re equipped to conquer mechanical obstacles and pave the way for a seamless mowing experience. Don’t let a stubborn starter dampen your green thumb aspirations. Embrace your inner lawn whisperer and keep those blades spinning effortlessly, rejuvenating your outdoor oasis.
Remember, the key to success lies not only in nurturing your lawn but also in providing your hardworking mower with some tender love and care. Regular maintenance, cleaning, and troubleshooting will ensure you spend more time enjoying your freshly cut grass and less time wrestling with a challenging starter.
Wishing you many seasons of lush lawns, buzzing motors, and the satisfaction that comes with being a master of your mower. Onwards and upwards!

- When to Put Weed and Feed on Lawn in Michigan - October 16, 2023
- When to Fertilize Potatoes Plants - October 16, 2023
- Can You Plant Clover in the Spring - October 16, 2023