Unyielding raindrops, resembles childhood tea parties. But when it comes to your trusty weedeater nestled in the garage, a torrential downpour does little to conjure up delightful memories. Alas, the unexpected has happened – your loyal companion finds itself soaked in water and shows no signs of life. Fret not, intrepid landscaper, for amidst this aquatic adversity lies the key to resurrecting your flooded weedeater. In this article, we shall delve into the magical realm of weedeater revival and discover the secrets behind coaxing your sopping tool back to life. So don your waterproof cape, grab your toolkit, and prepare to embark on an odyssey to revive your drowned weedeater!

Finding the Root of the Problem: Understanding Why Your Weedeater is Flooded
One common issue faced by weedeater owners is a flooded engine. It can be frustrating when you’re eager to tackle those stubborn weeds but your trusty tool refuses to start. Understanding why your weedeater is flooded is the first step towards resolving the problem and getting back to work efficiently.
Firstly, a flooded weedeater occurs when there is an excessive amount of fuel in the engine, preventing it from starting. This can happen due to several reasons, including over-priming, a dirty carburetor, or a faulty spark plug. To tackle this issue, you can try the following steps:
- Inspect the fuel line: Ensure that the fuel line is not clogged or blocked. A blocked fuel line can lead to improper fuel flow, causing the engine to flood. If necessary, clean or replace the fuel line to ensure it is functioning properly.
- Check the carburetor: A dirty carburetor can disrupt the air-fuel mixture, leading to a flooded engine. Remove the carburetor and clean it thoroughly, ensuring that all its components are clear of debris or dirt.
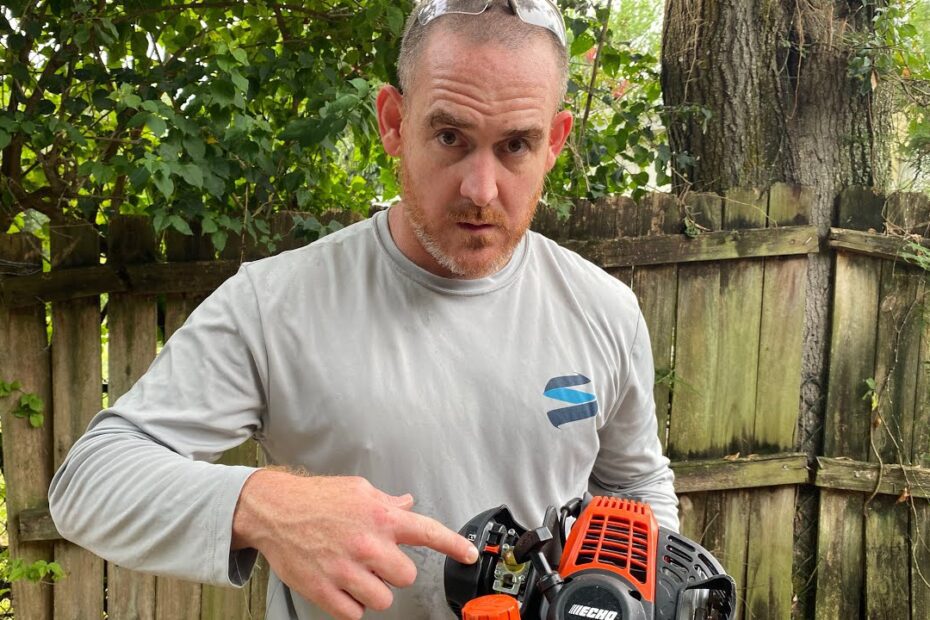
- Examine the spark plug: A faulty spark plug can also contribute to engine flooding. Remove the spark plug and inspect it for signs of damage or wear. If necessary, clean or replace the spark plug to ensure proper ignition.
Taking these steps will help you diagnose and resolve the root cause of your weedeater’s flooding issue. By understanding why your weedeater is flooded, you can confidently implement the necessary steps to start your tool smoothly and efficiently.

The Right Steps to Take: Safely Starting a Flooded Weedeater
There’s nothing more frustrating than grabbing your trusty weedeater, only to realize it’s flooded and won’t start. But fear not, with the right steps, you can safely and effectively get your weedeater up and running again. Here are a few key tips to help you tackle this common hurdle:

-
Drain the excess fuel: Start by removing the spark plug wire to ensure the engine doesn’t accidentally start. Locate the fuel tank and empty any excess fuel. You can do this by either holding the weedeater horizontally or carefully tilting it over a container to catch the fuel. Once drained, wipe any excess fuel residue from the machine.
-
Check the spark plug: A flooded weedeater often has a wet spark plug. Pull out the spark plug using a socket wrench and inspect it for any signs of moisture. If it appears wet, gently clean it using a wire brush and leave it to dry for a few minutes. This step will significantly improve the chances of a smooth start.
Now that you’ve learned the basic steps to address a flooded weedeater, take a look at the table below for some additional features and tips that can help you maintain and prevent flooding in the future:
| Feature/Tips | Description |
|---|---|
| Primer bulb | Having a primer bulb allows you to manually pump fuel into the carburetor, making the starting process easier and quicker. |
| Fuel stabilizer | Adding a fuel stabilizer to your fuel mixture can extend the shelf life of the gasoline and reduce the likelihood of it becoming stale, which can lead to flooding. |
| Regular maintenance | Regularly cleaning and inspecting your weedeater, especially the carburetor and fuel system, can prevent debris buildup and ensure proper functioning, reducing the chances of flooding. |
First and foremost, it’s important to remember that safety should always be your top priority. Ensure that you are wearing the necessary protective gear, such as safety glasses and gloves, before attempting any of these techniques. Now, let’s dive into the tried-and-true methods to start a flooded weedeater:
| Technique | How to |
|---|---|
| Spark Plug Method | Remove the spark plug and pull the starter cord several times to clear out excess fuel. Clean or replace the spark plug if necessary, reinsert it, and give it another try. |
| Carburetor Adjustment Technique | Locate the carburetor adjustment screws and turn them clockwise until they are snug. Then, turn them counterclockwise 1.5 turns. This will ensure a proper air-fuel mixture and make starting easier. |
| Fuel System Cleaning | If the above techniques fail, it might be time to give your weedeater’s fuel system a thorough cleaning. This involves disassembling the carburetor, cleaning all the components, and reassembling them. Refer to your weedeater’s manual or consult a professional for detailed instructions on this process. |
Remember, starting a flooded weedeater takes patience and practice. If one technique doesn’t work, don’t give up! Give another method a try, and soon enough, you’ll have your weedeater purring like a content feline. Now go out there and conquer those unruly weeds like the seasoned pro that you are!
Keeping Your Weedeater in Great Shape: Preventive Measures for Future Flooding
Dealing with a flooded weedeater can be a frustrating and time-consuming task. However, with the right knowledge and preventive measures, you can avoid this issue and keep your weedeater in great shape. Here are some tips to help you start a flooded weedeater and prevent future flooding:
1. Clear the Air Filter
A clogged air filter can prevent proper airflow and lead to a flooded weedeater. Regularly check and clean your air filter to ensure it is free from dirt, debris, and oil buildup. Consider replacing the air filter if it is damaged or too dirty.
2. Check the Fuel System
Inspect the fuel lines, fuel filter, and carburetor of your weedeater for any signs of damage or blockage. Replace damaged parts and clean any clogs to ensure a smooth fuel flow. It’s also important to use fresh fuel and mix it according to the manufacturer’s recommendations.
| Preventive Measures for Flooding | |
|---|---|
| Feature/Tips | Description |
| Regular Maintenance | Perform regular checks and maintenance tasks to keep your weedeater running smoothly and prevent issues like flooding. |
| Store in a Dry Place | When not in use, store your weedeater in a dry and sheltered area to prevent water damage and potential flooding. |
| Use a Fuel Stabilizer | Add a fuel stabilizer to your fuel mixture to prevent fuel degradation and improve the overall performance of your weedeater. |
3. Practice Proper Starting Technique
When starting a flooded weedeater, follow these steps:
- Set the choke lever to the closed position.
- Pull the recoil starter gently until you feel resistance, then give it a firm and quick pull. Repeat this step up to five times.
- If the weedeater doesn’t start after five attempts, wait for a few minutes to let the excess fuel evaporate before repeating the process.
- Once the weedeater starts, adjust the choke lever to the open position gradually.
By keeping these preventive measures in mind and following the right starting technique, you can ensure that your weedeater stays in great shape and avoid future flooding issues.
Frequently Asked Questions
Q: What is the secret trick to starting a flooded weedeater?
A: Ah, the dreadful flooded weedeater, a stubborn machine that refuses to cooperate! Let’s unlock the mysteries, shall we? Simply remove the spark plug and pull the starter cord a few times to expel the excess fuel from the cylinder. Now, put that spark plug back in and give it another go! Voila, your weedeater should now purr like a contented kitten.
Q: Is there a fancy technique to avoid flooding a weedeater in the first place?
A: Absolutely! Picture this: you’re about to tackle the unruly garden, but your weedeater is in cahoots with Mother Nature, playing hard to start. Fear not, dear reader, for an ounce of prevention is worth a pound of cure. When cold-starting, ensure that the choke is engaged accordingly. Remember, gentle priming is key! After igniting the engine, gradually release the choke, allowing your weedeater to gracefully ease into action.
Q: Help! My weedeater still won’t budge! What’s my next move?
A: Oh, the frustration! But don’t you worry, we’ve got an ace up our sleeve. When all else fails and your weedeater remains defiant, it’s time to check the air filter. Remove this little culprit, for it may be clogged with debris, suffocating your weedeater’s dreams of becoming a lawn-wizard. Rinse it thoroughly or replace it, and with a sprinkle of luck, your weedeater will finally spring to life, ready to conquer those stubborn blades of grass once and for all! As we bring this article to a close, we hope that we’ve shed some light on the art of starting a flooded weedeater – a pursuit that may seem daunting to some but proves to be gratifying to those who master it. While the odds may be stacked against you with a flooded weedeater, fear not, for armed with our tips and tricks, you possess the power to conquer the challenge.
Remember, amidst the frustration and potential embarrassment, patience is your greatest ally. Take a deep breath and embrace the task at hand with a newfound determination. Picture yourself as a maestro of mechanics, orchestrating the symphony of revving engines and vanquished weeds. With each failed attempt, let yourself be fueled by the desire to understand and adapt until victory is within your grasp.
In your journey to revive your flooded weedeater, you become a problem-solving pioneer amid the tangled web of wires and gasoline. And with each successful start, you’ll be reminded that sometimes, the most rewarding accomplishments come from facing and overcoming the seemingly impossible.
So, whether you find yourself in the midst of a flooded weedeater predicament or simply seeking the knowledge to navigate a potentially dampened future, we hope this guide has served you well. May it equip you with the tools and confidence you need to tip the scales in your favor and reclaim the power over your unruly yard.
Now, arm yourself with this newfound wisdom, don your casual mechanic persona, and venture forth into the tangled wilderness of weeds with your weedeater held high. Remember, every start is a testament to your resilience and resourcefulness. And in the end, you may come to realize that starting a flooded weedeater is not just a mere task but rather a gateway into a realm of perseverance, triumph, and the pure joy of a perfectly manicured lawn.
So, go forth, intrepid reader, and may the fuel be with you, forever banishing the dread of a flooded weedeater.

- When to Put Weed and Feed on Lawn in Michigan - October 16, 2023
- When to Fertilize Potatoes Plants - October 16, 2023
- Can You Plant Clover in the Spring - October 16, 2023