Unleashing nature’s vivid palette upon the barren earth is an artistry known as hydroseeding. Whether you yearn to transform a dull landscape into a lush oasis or need to swiftly cover large areas with green goodness, hydroseeding is the answer. As you embark on this journey of botanical bliss, it is crucial to lay the groundwork meticulously. In this guide, we will explore the secrets of prepping for hydroseeding, helping you create an unparalleled canvas for Mother Nature’s emerald touch. So strap on your gardening gloves and prepare to delve into the enchanting realm where seeds meet water, as we unravel the steps required to embark on a hydroseeding adventure like no other.

Preparing the Soil for Hydroseeding: Achieving Optimal Conditions
Hydroseeding is an excellent way to establish lush, green lawns quickly and efficiently. However, achieving optimal conditions for hydroseeding requires thorough soil preparation. Taking the time to properly prepare the soil will greatly increase the chances of successful germination and a beautiful, healthy lawn. Here are some essential tips to help you achieve the best results when prepping for hydroseeding:
| Features | Tips |
|---|---|
| Soil Testing | Before hydroseeding, conduct a soil test to determine its pH level and nutrient content. Adjust the pH as needed and add any necessary amendments to create the ideal growing environment for your desired grass type. |
| Weed Removal | Ensure the area is free of weeds before hydroseeding. Remove any existing weeds manually or use a suitable herbicide. This will prevent competition for resources and allow your grass seed to flourish. |
| Moisture Management | Proper soil moisture is crucial for successful germination. Before hydroseeding, ensure the soil is moist but not waterlogged. This can be achieved by watering the area regularly in the days leading up to the hydroseeding process. |
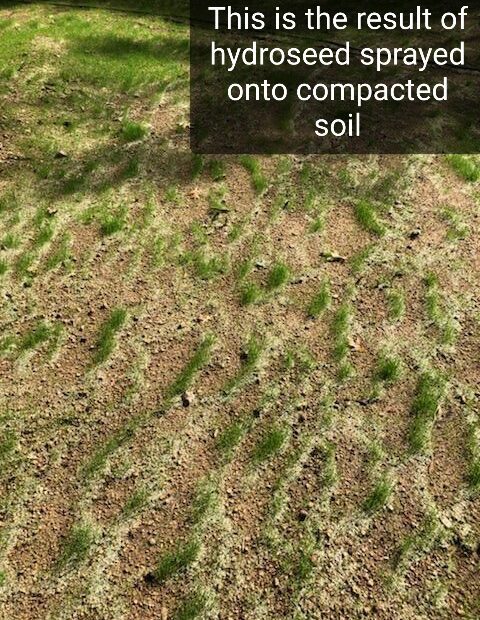
Additionally, it is important to consider the soil’s texture. Loosening compacted soil will promote better water absorption and root growth. Use a tiller or aerator to break up compacted areas before hydroseeding. Remove any debris or rocks that may hinder growth. By following these tips, you’ll create an ideal environment for hydroseeding, setting the stage for a thriving and vibrant lawn.

Choosing the Right Seed Mixture: Enhancing Growth and Aesthetic Appeal
When it comes to creating a lush and vibrant landscape, hydroseeding is a popular choice among homeowners and landscapers alike. Not only does it provide quick and even coverage, but it also helps enhance the growth and aesthetic appeal of your lawn. However, to achieve the best results, it is crucial to select the right seed mixture for your specific needs. By making an informed choice, you can ensure that your hydroseeding project flourishes into a breathtaking natural masterpiece.
So, how exactly do you prep for hydroseeding? To help you in this endeavor, we have compiled some essential features and tips to consider when choosing the ideal seed mixture for your hydroseeding venture:

| Feature/Tips | Benefit |
|---|---|
| Diversity of Grasses: | Opt for a seed mixture that includes various types of grasses to ensure a uniform, aesthetically pleasing look. |
| Climate Adaptability: | Select seeds that are well-suited to your local climate conditions, ensuring improved tolerance to heat, cold, or drought. |
| Soil Compatibility: | Consider the composition of your soil to choose a seed mixture that complements and enriches the existing soil fertility. |

Applying Hydroseeding Mulch: Ensuring Successful Germination and Erosion Control
Hydroseeding is a popular and effective technique for establishing lush green lawns and controlling erosion. To ensure successful germination and long-term erosion control, proper preparation is key. Before embarking on your hydroseeding project, follow these essential steps to properly prep your area:
- Clear the area: Remove any existing vegetation, rocks, debris, and weeds from the designated area. This will provide a clean slate for your hydroseeding efforts and prevent competition with the new seedlings.
- Address soil quality: Soil plays a crucial role in promoting germination and growth. Conduct a soil test to determine its pH level and nutrient content. This will help you identify any deficiencies that need to be corrected before hydroseeding. Consult a professional to adjust the soil pH and add appropriate fertilizers or amendments as needed.
- Grade the surface: Level the area and ensure proper drainage by smoothing out any bumps or depressions in the soil. This will prevent water pooling, which can hinder seed growth.
Now that you have prepped your area for hydroseeding, it’s time to focus on selecting the right hydroseeding mulch and application technique. Here are some important features and tips to consider:
| Features | Tips |
|---|---|
| 1. Quality mulch: | Use a high-quality mulch that is free from weed seeds and other contaminants. This will provide excellent coverage and retain moisture for optimal germination. |
| 2. Adequate application rate: | Follow the manufacturer’s instructions to determine the appropriate mulch-to-water ratio. Applying the correct amount of mulch will ensure even coverage and prevent erosion. |
| 3. Regular watering: | Maintain consistent moisture levels by watering the newly hydroseeded area regularly. This will aid in the germination process and help establish healthy root systems. |

Watering and Maintenance Tips: Nurturing a Lush and Vibrant Lawn
When it comes to preparing your lawn for hydroseeding, there are a few key steps to follow to ensure successful results. Firstly, make sure you have cleared any debris or weeds from the area where you plan to seed. This will provide a clean and healthy foundation for your new lawn to grow. Next, it’s important to properly fertilize the soil to provide the necessary nutrients for your grass seedlings to thrive. Opt for a slow-release fertilizer that will gradually release essential elements over time, promoting long-lasting growth.
Additionally, proper watering is crucial for the success of your hydroseeding project. To prevent your newly seeded lawn from drying out, aim to water it two to three times a day for the first few weeks. However, be careful not to overwater, as this can lead to the growth of weeds or fungal diseases. It’s best to water in the early morning or late evening when temperatures are cooler and evaporation is minimized.
| Features: | Tips: |
|---|---|
| 1. Adequate drainage: | Ensure your lawn has proper drainage to prevent pooling or stagnant water, which can be harmful to the grass. |
| 2. Regular mowing: | Once your hydroseeded lawn has established, maintain it by following a regular mowing schedule to encourage healthy growth. |
| 3. Weed control: | To prevent weeds from overtaking your lush lawn, apply a pre-emergent herbicide in early spring and spot treat any emerging weeds promptly. |
Frequently Asked Questions
Q: What’s the best way to make your lawn bloom in no time?
A: Hydroseeding is the secret weapon! By applying a mixture of seed, water, fertilizer, and mulch, you can create a thriving green oasis. Get ready to impress your neighbors with lush grass in weeks, not months!
Q: Can I simply sprinkle grass seed on my lawn, or do I need to do something extra?
A: While traditional seeding methods work, hydroseeding takes it to the next level. The specialized hydroseeding equipment evenly distributes the seed mixture, ensuring better germination rates and uniform coverage. So, ditch those old-school methods and embrace the wonders of hydroseeding for a stunning landscape.
Q: How should I prepare my lawn before hydroseeding?
A: Prepping your lawn before hydroseeding is crucial for success. Start by removing any existing vegetation, rocks, or debris. Level the ground and ensure proper drainage. Give it a good raking to loosen up the soil and remove any dead grass. Finally, follow the hydroseeding professional’s advice on pH level adjustments and soil amendments, if needed.
Remember, the key to a spectacular lawn is thorough preparation! As we conclude this green adventure, you are now armed with a plethora of knowledge and wisdom, ready to embark on your hydroseeding journey. Remember, the task at hand may seem daunting, but fear not, for the fruits of your labor will be a lush, verdant landscape that captivates the senses.
With your newfound understanding, you are prepared to transform barren grounds into a tapestry of life, vibrating with vibrant hues, and teeming with nature’s orchestra. The key lies in careful planning, diligent preparation, and a sprinkle of patience.
As you gather your equipment and mindfully select your seed mix, visualizing the future masterpiece that lies ahead, always remember the importance of soil preparation – a crucial step that ensures a robust foundation and nourishes your seeds to growth.
While the allure of shortcuts may tempt you, resist the temptation and embrace the art of patience. The process of hydroseeding is akin to raising a child; it requires nurture, attention, and an understanding that beauty takes time to unfold.
As you embark on this hydroseeding adventure, be prepared to face challenges. Mother Nature teaches us valuable lessons along the way, reminding us of her capriciousness. It is in these moments that our creative problem-solving skills will shine, enabling us to adapt, overcome, and achieve a landscape even more magnificent than imagined.
With your hydroseeding dream entering reality, revel in the mesmerizing dance of spray, water, seeds, and mulch. Watching as nature’s gentle touch weaves its magic, igniting life amidst the inanimate, will fill your heart with joy and a sense of accomplishment.
In this symbiotic relationship between man and nature, remember that after the hydroseeding process is complete, your role as a steward of this newfound paradise continues. Nourish it with care, shower it with love, and embrace the tranquility it affords.
So, my fellow visionary, as you embark on your hydroseeding odyssey, let your passion for nature guide you, allow your creativity to flourish, and let the canvas of your once-barren land transform into a masterpiece that will inspire awe and admiration for years to come.

- When to Put Weed and Feed on Lawn in Michigan - October 16, 2023
- When to Fertilize Potatoes Plants - October 16, 2023
- Can You Plant Clover in the Spring - October 16, 2023
Contents
- 1 Preparing the Soil for Hydroseeding: Achieving Optimal Conditions
- 2 Choosing the Right Seed Mixture: Enhancing Growth and Aesthetic Appeal
- 3 Applying Hydroseeding Mulch: Ensuring Successful Germination and Erosion Control
- 4 Watering and Maintenance Tips: Nurturing a Lush and Vibrant Lawn
- 5 Frequently Asked Questions