Intertwined with the nostalgia of summer picnics and garden-fresh delights, the crisp, sweet bliss of biting into a Walla Walla onion is simply unparalleled. Firmly rooted in the fertile soil of Walla Walla Valley, Washington, these iconic onions have become a treasured gem for garden enthusiasts and culinary adventurers alike. But how does one unlock the secret to cultivating these pearly orbs of flavor in their own backyard? Fear not, for in this verdant guide, we shall embark on a horticultural journey to plant and nurture these glorious Walla Walla onions, bringing forth a harvest that shall leave your taste buds forever grateful. Prepare your soil, dust off those gardening gloves, and let us delve into the intricacies of growing these renowned bulbs – transforming your garden into an emporium of culinary bliss.

Preparing the Soil for Walla Walla Onions
So, you’ve decided to grow your own Walla Walla Onions. Congratulations! These sweet and flavorful onions are a favorite among gardeners and chefs alike. To ensure a successful onion harvest, it’s crucial to give your onions a great start by preparing the soil properly.
Here are some essential tips to get your soil ready for planting Walla Walla Onions:
| Feature/Tips | Description |
| Loose and Well-Drained Soil | Onions thrive in loose soil that is well-drained, ensuring healthy root development and preventing waterlogged conditions. |
| Proper pH Balance | Aim for a pH level between 6.0 and 7.5. Adjust the soil acidity by adding organic matter or lime, maintaining an optimal environment for your onions. |
| Ample Sunlight | Walla Walla Onions require at least six hours of direct sunlight each day. Choose a location that receives ample sunlight to promote bulb development. |
Additionally, it’s beneficial to incorporate organic matter into the soil to improve its fertility and structure. Adding compost or well-rotted manure before planting provides essential nutrients and enhances water retention. Remember to remove any rocks, weeds, or grass from the plot as they can hinder onion growth. Once your soil is prepared, you’ll be ready to plant those delicious Walla Walla Onions!

Choosing the Right Time to Plant Walla Walla Onions
When it comes to planting Walla Walla onions, timing is everything. These sweet and flavorful onions thrive in cooler temperatures, making them a popular choice for gardeners looking to add a delicious twist to their dishes. But how do you know when the right time to plant these onions is? Let’s take a closer look at some helpful tips and features to guide you in your onion-growing journey.

-
Know Your Climate: Walla Walla onions grow best in areas with mild, cool climates. They prefer temperatures between 55°F and 75°F (13°C and 24°C). If you live in a region with harsh winters or scorching summers, it’s essential to adjust your planting time accordingly.
-
Start Indoors or Directly in the Soil?: You have the option to start your Walla Walla onion seeds indoors or plant them directly in the soil. Starting seeds indoors allows for an earlier planting time, giving your onions a head start. Alternatively, planting directly in the soil can be done once the ground has warmed up, typically in early spring. Consider your local climate and gardening preferences when deciding which method to choose.
-
Spring Planting: For most gardeners, a spring planting proves to be the most successful. Aim to start your Walla Walla onion seeds indoors 8-10 weeks before the last expected frost date. Once the seedlings have reached a height of 4-6 inches, you can transplant them into your garden. Make sure the soil is well-drained and in a sunny spot, as Walla Walla onions need at least 6 hours of sunlight per day.
Now, let’s dive deeper into the tips and features that make Walla Walla onions a fantastic addition to any garden:
| Features | Tips |
|---|---|
| Sweet and mild flavor | Harvest when the tops turn yellow and start to fall over |
| Large-sized bulbs | Space plants 4-6 inches apart for optimal growth |
| Long shelf life | Allow bulbs to dry for a few weeks before storing in a cool, dry place |
With these tips and features in mind, you’ll be well-equipped to choose the perfect time to plant your Walla Walla onions. Get ready to enjoy a bountiful harvest and elevate your culinary creations with these delightful, sweet onions!

Steps to Plant Walla Walla Onions in Your Garden
Walla Walla onions, renowned for their sweet and mild flavor, are a delightful addition to any garden. Whether you’re an experienced gardener or a novice, planting Walla Walla onions is a straightforward and rewarding endeavor. Here are some easy steps to transform your garden into a thriving haven for these delectable bulbs:
- Choose the right time: Walla Walla onions perform best when planted in early spring, once the soil has warmed up and is workable. It’s crucial to select a location that receives full sun and has well-draining soil.
- Prepare the soil: Prior to planting, enrich the soil with organic matter like compost to ensure proper drainage and fertility. Loose soil allows the onion bulbs to develop without obstruction. Remove any weeds or debris from the planting area.
- Select quality onions: Purchase Walla Walla onion plants from a reputable nursery or garden center. Look for healthy transplants with firm and green tops. Avoid plants with any signs of disease or wilting.
Planting the onions:
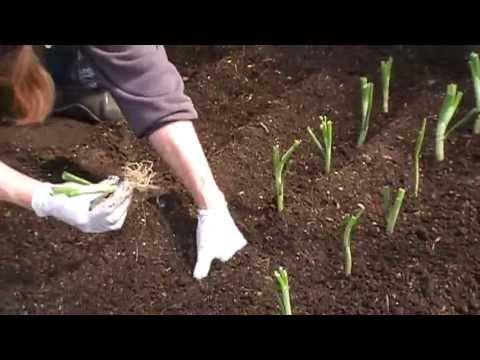
- Space the plants: Place the onion transplants in the prepared soil, ensuring that they are spaced at least 4-6 inches apart. This allows enough room for the bulbs to grow and develop.
- Planting depth: Gently press each transplant into the soil, ensuring that the root bulb is fully covered and the top of the bulb is barely visible. Onions need sufficient soil contact to establish strong roots and absorb nutrients effectively.
- Watering and maintenance: After planting, water the onions deeply to settle the soil and promote root growth. Keep the soil consistently moist but not waterlogged. Regularly remove weeds around the plants, which can compete for nutrients.
| Features | Tips |
|---|---|
| High sugar content, resulting in a sweet flavor. | Harvest the onions when the tops start to dry and flop over, then gently lift them from the soil. |
| Large, globe-shaped bulbs. | Store harvested onions in a cool, dry location for the best shelf life. |
| Long storage potential. | Avoid excessive nitrogen fertilization, as it can lead to lush foliage but smaller bulbs. |

Providing Proper Care for Growing Walla Walla Onions
So, you’ve decided to embark on the journey of growing Walla Walla onions. Congratulations! These sweet and succulent onions are a favorite among gardeners and culinary enthusiasts alike. To ensure a successful harvest, it’s crucial to provide them with the proper care they need. Here are a few tips to help you grow the best Walla Walla onions:
| Features | Tips |
|---|---|
| Walla Walla onions have a high water content and are prone to rot | Ensure optimum drainage by adding compost or organic matter to the soil. |
| Onions thrive in full sun and require at least 6-8 hours of direct sunlight per day | Choose a sunny location for planting your onions and avoid areas with excessive shade. |
| Proper spacing is vital to allow bulbs to develop fully | Space your onion plants about 4-6 inches apart to provide enough room for bulb expansion. |
Remember, Walla Walla onions are known for their sweet flavor, so they require consistent moisture to develop properly. Water them deeply at least once a week, ensuring the soil is evenly moist. Mulching can also help retain moisture and suppress weed growth. Additionally, it’s important to keep an eye out for pests and diseases such as onion maggots and downy mildew. You can apply insecticidal soap or organic fungicides to protect your plants.
As the bulbs mature, you’ll notice the green tops start to yellow and fall over. Once this happens, it’s time to harvest your onions. Carefully dig them up, brush off any excess soil, and allow them to dry in a well-ventilated area for a few weeks. With proper care and patience, you’ll be rewarded with bountiful harvests of delicious Walla Walla onions that are perfect for salads, sandwiches, or caramelizing in your favorite recipes.
Frequently Asked Questions
Q: What do Walla Walla onions and summer sunshine have in common?
A: Walla Walla onions thrive in the summer sunshine, making it the ideal season for these sweet and succulent bulbs to flourish.
Q: How can I make my Walla Walla onions feel like they are on cloud nine?
A: To ensure your Walla Walla onions feel heavenly, make sure to plant them in loose, well-drained soil and provide them with ample space to spread their roots. Giving them a little extra love and care will yield heavenly harvests.
Q: What’s the secret to transforming my garden into a Walla Walla onion paradise?
A: The secret to creating a Walla Walla onion paradise lies in the location. Choose a sunny spot in your garden that receives at least six to eight hours of direct sunlight daily. Treat your onions to a nutrient-rich soil and maintain consistent watering to witness the magic unfold. Your garden will be an onion haven in no time! As we bring our journey to a close, we hope you’ve found our guide to planting Walla Walla onions as delightful as the taste of these succulent gems themselves. Remember, with a little bit of patience, care, and a sprinkle of magic, you too can weave your own tapestry of onion-growing mastery. So, put on your gardening gloves, grab that trowel, and venture into the world of Walla Walla wonderment! Just imagine the joy of holding in your hands those splendid bulbs, crafted by nature’s hand. Whether you choose to experiment in containers or create a vibrant onion patch, let the anticipation of tender sweetness mark the path ahead. With each harvest, you’ll not only reap a bountiful yield but also nurture an unbreakable bond with the land that sustains us all. So, dear green thumbs, seize this opportunity, cultivate your own patch of onion paradise, and let the fragrance of success waft through your garden gates. May your soil always be fertile, your onion crop ever abundant, and your culinary adventures forever blessed with the luscious Allium cepa. Remember, the journey of onion planting is not just about the yield but also the nurturing of growth – not solely of the plant but of that inner gardener within us all. With this knowledge, you now hold the seeds of wisdom to embark on an onion-growing quest like no other. Go forth, fellow plant enthusiasts, and let the Walla Walla onions grace your kitchen with their splendor, and your soul with the gratification that only nature’s miracles can provide. Until we meet again, happy gardening!

- When to Put Weed and Feed on Lawn in Michigan - October 16, 2023
- When to Fertilize Potatoes Plants - October 16, 2023
- Can You Plant Clover in the Spring - October 16, 2023