In the enchanting realm of gardening, where flowers gracefully bloom and nature’s palette thrives, lies an art seldom spoken of, yet essential to the vibrant tapestry of any flourishing landscape: the delicate skill of laying pine straw in flower beds. With its rustic charm and countless benefits, this age-old practice is a sacred dance between man and earth, ensuring the longevity and splendor of our beloved blossoms. Nature herself whispers secrets within her cradled pine needles, and today, we embark on a journey to decode her language, as we delve into the intricacies of this extraordinary art. So grab your gloves and embrace the whimsical melody of nature’s symphony as we guide you through the steps to masterfully truffle your flowerbeds with the earthy embrace of pine straw.
Preparing the Flower Beds for Pine Straw Installation
Creating a beautiful garden starts with properly . Pine straw is not only a cost-effective and eco-friendly mulching option, but it also enhances the overall aesthetics of your flower beds. Follow these simple steps to ensure a successful and hassle-free pine straw installation process.
Clearing and Cleaning
Before laying pine straw, it is crucial to clear the flower beds of any existing vegetation, debris, or weeds. Remove any unwanted plants or grass, as they can compete for nutrients with your desired flowers. Taking the time to remove these obstacles will allow the pine straw to perform optimally.
Preparing the Soil
Once the flower beds are cleared, it’s essential to prepare the soil for the pine straw installation. Loosen the soil using a garden fork or tiller to improve aeration and drainage. Mix in compost or organic matter to enrich the soil’s nutrient content, promoting healthy growth for your plants.
Installing the Pine Straw
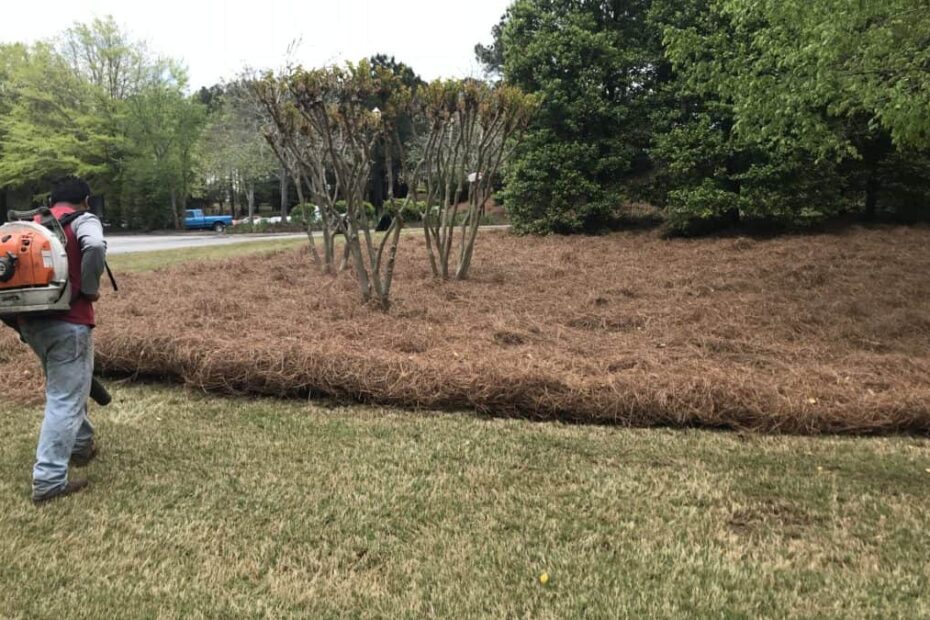
Now comes the exciting part – laying the pine straw in your flower beds. Spread the pine straw evenly, creating a layer about 2-3 inches deep. Keep in mind that thicker layers may cause water penetration issues, so it’s best to avoid excessive depth.
Features and Tips
| Feature/Tips | Description |
|---|---|
| Weed Suppression | Pine straw acts as a natural barrier, preventing weed growth and reducing the need for pesticides. |
| Moisture Retention | By reducing evaporation, pine straw helps retain moisture in the soil, promoting healthier plants. |
| Aesthetic Appeal | The rich, reddish-brown color of pine straw adds a visually appealing touch to your flower beds. |


Choosing the Right Type and Quantity of Pine Straw for Your Flower Beds
When it comes to enhancing the beauty of your flower beds, choosing the right type and quantity of pine straw is crucial. Pine straw, also known as pine needles, not only adds an aesthetic appeal to your garden but also provides various benefits to your plants. Before you start laying pine straw in your flower beds, consider these important factors to ensure optimal growth and visual impact.
Firstly, consider the type of pine straw that suits your garden needs. There are two common types available: slash pine straw and longleaf pine straw. Slash pine straw tends to be shorter and thinner, providing a neat and tidy appearance. On the other hand, longleaf pine straw is longer and thicker, creating a more rustic and natural look. Choose the type that complements your garden style and desired aesthetic.
| Features | Tips |
|---|---|
| 1. Natural weed barrier: Pine straw acts as a natural weed barrier, suppressing pesky weeds from growing and competing with your flowers. | 1. Consider the quantity: The ideal depth for pine straw in flower beds is around 2-3 inches. Be sure to calculate the required quantity based on the area of your beds to achieve the desired thickness. |
| 2. Moisture retention: Pine straw helps retain moisture in the soil, preventing it from evaporating too quickly. This is especially beneficial during hot summer months. | 2. Spread evenly: When laying pine straw, ensure an even distribution to provide consistent coverage. This not only helps with weed control but also creates visual appeal. |
| 3. Soil insulation: The layer of pine straw acts as insulation for the soil, protecting the roots of your flowers from extreme temperature fluctuations. | 3. Refresh regularly: Over time, pine straw may break down or lose its vibrant color. Refresh your flower beds by adding a thin layer of new pine straw annually or as needed. |
By considering these factors and tips when choosing and laying pine straw in your flower beds, you’ll create a stunning and well-maintained garden. The right type and quantity of pine straw will not only enhance the beauty of your flowers but also provide them with the necessary support and protection they need to thrive.

Proper Techniques for Laying Pine Straw in Flower Beds
In order to create an eye-catching and well-maintained flower bed, it is crucial to master the proper techniques for laying pine straw. This natural and eco-friendly mulch not only provides a beautiful backdrop for your flowers but also helps in moisture retention and weed prevention. To make the most of your garden and ensure the success of your flower bed, follow these expert tips and tricks.
Firstly, prepare the flower bed by removing any existing weeds or debris. This will create a clean canvas for the pine straw to be laid on. Next, spread a layer of landscape fabric over the bed to prevent weed growth and allow for better water drainage. Now comes the fun part – placing the pine straw! Start by spreading a thin layer of straw around the plants and flowers, gently tucking it in to create an even and neat appearance. Be sure to avoid piling it up against the stems of the plants, as this can cause smothering and rotting. When applying the pine straw, remember to work in sections, focusing on one area at a time to maintain a consistent and balanced look. To cover a larger area efficiently, use a pitchfork to spread the pine straw evenly, ensuring a snug fit between plants.
Additionally, here are some effective features and tips to keep in mind while laying pine straw:
| Features/Tips | Description |
|---|---|
| Biodegradable | Pine straw is an organic material that decomposes over time, adding nutrients to the soil. |
| Weed Suppression | The dense layer of pine straw acts as a natural barrier, preventing weed growth and minimizing the need for herbicides. |
| Moisture Retention | Pine straw helps retain moisture in the soil, reducing the frequency of watering and providing a healthy environment for plant roots. |
So, whether you’re a seasoned gardener or a beginner, these techniques and features will aid you in creating a stunning flower bed that is sure to impress. With a little bit of patience, practice, and a touch of creativity, your garden will flourish and be the envy of the neighborhood. Embrace the beauty of pine straw and transform your flower beds into a thriving oasis of colors and textures.
Maintaining and Refreshing Pine Straw in Your Flower Beds
When it comes to , there are a few important steps you need to follow to ensure the best results. Not only does pine straw give your flower beds a clean and polished look, but it also helps with weed control and moisture retention. In this post, we will guide you on how to properly lay pine straw in your flower beds, so you can enjoy a beautiful and well-maintained garden.
Firstly, make sure you prepare the flower beds by removing any existing debris, such as leaves or old pine straw. This will ensure a clean and fresh base for your new pine straw. Once you’ve cleared the area, it’s time to spread a layer of weed barrier fabric. This will prevent weed growth and keep your flower beds looking neat and tidy. After laying the fabric, carefully spread an even layer of pine straw on top. Make sure to fluff up the straw to give it a natural and full appearance. Aim for a depth of around 2-3 inches, as this will provide optimal coverage and protection for your flower beds.
| Features | Tips |
|---|---|
| Enhances Aesthetic Appeal: | – Use fresh pine straw for a vibrant and rich color. |
| Weed Control: | – Apply a pre-emergent herbicide before laying the pine straw to further reduce weed growth. |
| Moisture Retention: | – Water the flower beds thoroughly prior to laying the pine straw to promote moisture retention. |
Frequently Asked Questions
Q: What’s the secret to achieving a picturesque garden with pine straw in flower beds?
A: It’s all about channeling your inner artist and following these simple steps!
Q: How do I prepare my flower beds before laying pine straw?
A: Before the magic begins, first remove any existing weeds or debris. Then, give your soil a good raking to ensure a smooth canvas for your pine straw masterpiece.
Q: Is there a specific technique for laying pine straw in flower beds?
A: Absolutely! To create a symphony of colors, start by gently spreading a thin layer of pine straw over your flower beds. Avoid piling it up too thickly, as you want the natural beauty of your plants to shine through. In the final moments of our pine straw laying journey, we hope you’ve found inspiration and practical tips to transform your flower beds into nature’s crown jewel. The humble yet transformative pine straw holds the power to embrace your garden with warmth, beauty, and a touch of rustic elegance.
As you venture forth armed with newfound knowledge, remember that the key to successful pine straw installation lies in the attention to detail and the love you pour into your garden. Each natural fiber placed delicately offers a whispered promise of nurturing the very roots that lie beneath.
Embrace the therapeutic process of laying pine straw and find solace in the rhythm of your own thoughts. Allow your fingers to gracefully guide each strand, understanding that you are partaking in a timeless dance between nature and nurture. Watch as the earth beneath your feet sighs in satisfaction, knowing it will soon be cradled by this organic treasure.
But remember, dear gardener, that planting pine straw is not merely an act of beautification. It is an ode to the delicate balance that exists within our ecosystems. The layers of pine needles that you so carefully arrange will act as guardians, protecting your precious flower beds from the harshness of the elements. In return, your garden will flourish, weaving its tapestry of colors and scents, inviting butterflies and birds to partake in its natural symphony.
So, go forth with confidence, carrying the knowledge of pine straw’s formidable role in your gardening arsenal. With each new season, as the sun-kissed warmth gives way to the icy breath of winter, revisiting this sacred ritual will become second nature. Together, you and nature will tango, laying down pine straw as an offering of protection and beauty.
And as you step back to admire your handiwork, surrounded by the whispers of the wind rustling through the newly adorned flower beds, take a moment to celebrate the symbiotic bond that exists between mankind and Mother Nature. In the art of laying pine straw, we find unity, purpose, and the enduring promise of the seasons ahead.
For it is in these simple acts of stewardship that we uncover the profound connection between our hands and the earth beneath. It is here, within the delicate embrace of pine straw, that we find solace, artistry, and perhaps a glimpse of eternity itself.

- When to Put Weed and Feed on Lawn in Michigan - October 16, 2023
- When to Fertilize Potatoes Plants - October 16, 2023
- Can You Plant Clover in the Spring - October 16, 2023