The mystical allure of elderflowers has captivated us for centuries, their delicate petals unveiling an astonishing array of both flavor and fragrance. From enthralling our senses with heavenly teas and infusions to enhancing culinary delights with their unique floral essence, these mesmerizing blooms truly hold the power to transform any dish or beverage. However, one must tread carefully to capture their true essence and unlock their enchanting potential. In this guide, we embark on a quest to master the ancient art of drying elderflowers, unraveling the secrets that lie within each petal and ensuring their preservation in all their glory. So, gather your baskets and prepare to unearth the wisdom required to harness the aromatic prowess of these remarkable blossoms. Let us delve into the mystical world of elderflowers, as we unlock the gateways of floral preservation and discover the key to drying perfection.
Harvesting Elderflowers at the Optimal Time for Drying
Elderflowers, with their delicate aroma and numerous health benefits, are a popular ingredient used in teas, infusions, and a variety of culinary dishes. However, quickly harvesting elderflowers at their optimal time and ensuring their proper drying is essential to preserve their enchanting flavor and herbal properties. These ephemeral blossoms can easily lose their aroma and potency if mishandled during the drying process. Here are some helpful tips on how to dry elderflowers effectively, allowing you to stock up on this delightful ingredient all year round.
Timing is everything when it comes to harvesting elderflowers for drying. The ideal time to pluck these fragrant blooms is during a sunny morning, after the dew has evaporated but before the heady heat of the day sets in. This is when the flowers are in full bloom, rich with their signature fragrance. To harvest elderflowers, gently snip off the blossoms with a pair of clean, sharp scissors, leaving behind a small stem. Make sure to gather only the fresh, undamaged flowers, as any bruised or wilted blooms should be discarded. A gentle shake or gentle brushing beforehand can help remove any tiny insects that might have taken refuge on the flowers.
Once harvested, it’s time to prepare the elderflowers for drying. Do not wash the flowers, as this can cause them to lose their aroma. Instead, gently inspect each blossom and remove any residual dirt or unwanted bugs. Spread the cleaned flowers onto a clean, dry surface like a food-grade drying rack, ensuring that they are spaced out well to allow for proper air circulation. If you don’t have a drying rack, you can use a baking sheet lined with parchment paper. Place the elderflowers in a cool, dry, and well-ventilated area, away from direct sunlight. The flowers should be left to dry for about two to three weeks, or until they are completely crisp and brittle to the touch. This slow drying process will preserve the elderflowers’ delightful fragrance, ensuring they are ready for storage or use in your favorite recipes.
Table: How to Dry Elderflowers Effectively
| Feature/Tips | Description |
|---|---|
| Harvesting Time | Choose a sunny morning to harvest the elderflowers at their full bloom, maximizing their fragrance. |
| Picking Technique | Gently snip the fresh and undamaged flowers, discarding any wilted or bruised blooms. |
| Drying Methods | Opt for a food-grade drying rack or a baking sheet lined with parchment paper for proper air circulation during the drying process. |
<h1></h1>
<p>
    Drying elderflowers is a wonderful way to preserve their delicate fragrance and flavor, allowing you to enjoy them throughout the year. Before you begin the drying process, it is important to properly prepare and clean the elderflowers. Follow the steps below to ensure that your dried elderflowers turn out perfect every time.
</p>
<p>
    <h3>Cleaning Techniques:</h3>
    <ul>
        <li>Inspect the elderflowers for any signs of damage or insect infestation. Remove any damaged or discolored blossoms.</li>
        <li>Give the elderflowers a gentle shake to remove any dirt or tiny insects that may be hiding among the petals.</li>
        <li>Fill a bowl with cool water and add a splash of vinegar or lemon juice. Submerge the elderflowers in the water and let them soak for a few minutes to help remove any remaining dirt or bugs.</li>
        <li>Remove the elderflowers from the water and gently pat them dry with a clean, absorbent towel.</li>
    </ul>

    <h3>Preparation Techniques:</h3>
    <p>Once the elderflowers are clean, it's time to prepare them for the drying process. Here are a few tips to ensure optimal results:</p>
    <table>
        <tr>
            <th>Feature/Tips</th>
            <th>Benefits</th>
        </tr>
        <tr>
            <td><strong>Remove Stems</strong></td>
            <td>Removing the stems helps the elderflowers dry more evenly and prevents potential moisture retention.</td>
        </tr>
        <tr>
            <td><strong>Organize in a Single Layer</strong></td>
            <td>Arrange the elderflowers in a single layer on a clean, dry surface. This <a href="https://up-gardening.com/how-to-transplant-zinnia-seedlings/" title="How to Transplant Zinnia Seedlings">ensures proper air circulation</a> and prevents mold growth during the drying process.</td>
        </tr>
        <tr>
            <td><strong>Avoid Direct Sunlight</strong></td>
            <td>Place the elderflowers in a cool, well-ventilated area away from direct sunlight to preserve their vibrant color and delicate aroma.</td>
        </tr>
    </table>
</p>

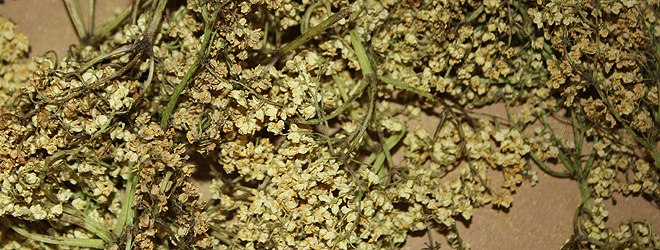
Best Methods for Air-drying Elderflowers
Elderflowers, with their delicate and fragrant blossoms, are cherished by many for their numerous culinary uses and health benefits. Air-drying elderflowers is a popular method to preserve their beauty and essence, ensuring a long-lasting supply for all your creative endeavors. If you’re wondering how to dry elderflowers, we’ve got you covered with the best methods that will result in perfectly preserved blooms.
One of the simplest and most traditional ways to air-dry elderflowers is by hanging them upside down. All you need is a piece of twine or string and a well-ventilated, dry area. Gently tie small bundles of elderflowers using the twine, making sure not to overcrowd them. Hang these bundles upside down from a hook or a bar in your chosen drying space. The key here is to allow sufficient airflow around each flower. Tip: Wait until the morning dew has evaporated for optimal drying conditions.
Another effective method for drying elderflowers is by using a mesh screen or a food dehydrator. Lay the flowers on a clean mesh screen, ensuring they are spread out in a single layer. Place the screen in a warm and dry location, preferably in a well-ventilated area. While using a food dehydrator, set it to a low temperature, around 35-40 degrees Celsius, and let the gentle heat do its magic. Feature: Using a food dehydrator helps maintain the flower’s vibrant color and aroma.
Mastering the art of air-drying elderflowers opens up an array of opportunities, from crafting delightful teas and infusions to creating unique culinary delights. Whether you choose to hang them upside down or opt for a mesh screen or dehydrator, these methods will ensure that your elderflowers retain their natural charm and aroma for as long as possible. So go forth and embrace the beauty of dried elderflowers in your creations!
Alternative Techniques for Dehydrating Elderflowers
Elderflowers are a delightful addition to many dishes and beverages, and drying them allows you to enjoy their unique flavor and aroma all year round. While air drying is the traditional method, there are alternative techniques that can expedite the drying process and help preserve the flowers’ qualities. Here are a few creative and effective techniques:
1. Microwave Drying
- Place elderflowers on a microwave-safe plate lined with a paper towel.
- Microwave on high for 20-30 seconds at a time, checking for dryness between intervals.
- Be cautious not to overheat the flowers, as this can affect their flavor and color.
- Let the flowers cool completely before storing in an airtight container.
2. Oven Drying
- Preheat your oven to its lowest temperature setting, usually around 150°F (65°C).
- Spread elderflowers on a baking sheet lined with parchment paper.
- Place the baking sheet in the oven and leave the door slightly ajar to allow moisture to escape.
- Dry the flowers for 1-2 hours, or until they are crispy and brittle.
- Once cooled, transfer the dried elderflowers to a sealed container to maintain their freshness.
| Technique | Features | Tips |
|---|---|---|
| Microwave Drying | Quick and efficient method | Monitor closely to prevent overheating |
| Oven Drying | Evenly dried flowers | Leave the oven door slightly open for ventilation |
| Air Drying | Gentle method that preserves flavor | Hang the flowers upside down in a dry area |
Experimenting with different drying techniques can help you find the method that works best for the elderflowers you have available. Whichever technique you choose, remember that proper storage is key to maintaining their quality, ensuring they can be enjoyed in delicious recipes and delightful infusions throughout the year.
Frequently Asked Questions
Q: What’s the best way to dry elderflowers?
A: Ahoy, flower enthusiasts! To dry elderflowers, you must summon the powers of the sun while keeping your patience intact. Find a clean, well-ventilated space that experiences gentle rays of sunshine, and lay the delicate elderflowers out to dry. Ensure they are spread in a single layer, resembling a lazy sunbathing session. Time and nature shall then perform their symphony, transforming these beautiful blossoms into ethereal dried wonders.
Q: Can I use a dehydrator or oven to dry elderflowers?
A: Ah, the alternative route, daring soul! If you seek the efficiency of modern contraptions, fear not, for the dehydrator and oven will come to your aid. Set your dehydrator to the gentlest of temperatures, like a cozy summer breeze, and place the elderflowers within its comforting embrace. Alternatively, if your oven boasts a low setting (around 50°C/122°F), you may arrange the elderflowers on a baking sheet and place them inside. Just remember, less is more; the gentle touch is what we seek.
Q: How will I know when my elderflowers are dry?
A: Aha! The time has come to quell the curiosity of anxious hearts. To determine if your elderflowers have fully embraced their dried destiny, inspect them with care. Are they crispy and fragile to the touch? Do they resemble a wistful memory, whispering secrets of their former glory? If so, rejoice! Your elderflowers have successfully completed their transformation into celestial botanical artifacts, ready to grace your culinary and decorative endeavors. As we bid farewell to the fragrant world of elderflowers, we hope that this guide has provided you with all the knowledge and inspiration needed to embark on your own drying adventure. Whether you envision delightful tea blends, artistic potpourri arrangements, or even unconventional culinary creations, let your imagination bloom alongside these delicate blossoms.
Remember, as you carefully pluck each cluster, the ephemeral beauty of elderflowers demands respect and appreciation. Treat them with tenderness, and they will reward you with their unmistakable charm, their indulgent aroma, and their wide range of benefits.
As the drying process unfolds, the air will be suffused with their sweet whispers, captivating all who encounter their ethereal presence. Soak in the joy of observing their transformation, as vibrant petals turn into treasures of grace. Patience will be your most valuable companion during this process, as it allows the flowers to slowly reveal their true essence, unfurl their secrets, and transcend into an everlasting state.
Once fully dried, elderflowers will become passports to delightful realms. They will ignite memories and transport you to sun-drenched meadows, where time stands still and worries dissipate like a gentle breeze. From comforting teas that warm the soul to whimsical decorations that bring life back to forgotten corners, your creations will be infused with the enchantment bestowed by these blossoms.
With every use, every sip, and every inhale, may the allure of the elderflowers remind you of the beauty that resides within nature’s profound offerings. As you dry and preserve these ethereal blooms, embrace the wisdom of patience and the artistry of preservation. Celebrate the legacy of this modest flower and cherish the moments it brings to your life.
So, let us now bid adieu to our time spent uncovering the secrets of elderflowers. May this guide have inspired you to embark on a captivating journey, filled with petals, aromas, and the joy of capturing fleeting beauty. May your path be paved with wonder and your creations be touched by the magic of these magnificent blossoms.
Keep drying, keep exploring, and may your future encounters with elderflowers be filled with joyous discoveries and endless creativity. Until we meet again in the world of nature’s wonders!

- When to Put Weed and Feed on Lawn in Michigan - October 16, 2023
- When to Fertilize Potatoes Plants - October 16, 2023
- Can You Plant Clover in the Spring - October 16, 2023