Unleash the enchanting realm of your unruly, ever-growing wilderness as we embark on a mystical journey together in the realm of lawn mower battery disconnection. Leave behind the chaos of tangled grass strands and the cacophony of roaring engines, for today we delve into the ethereal art of disconnecting the very heartbeat of your loyal mechanical steed. With a touch of neutrality in our voices, we shall illuminate the path to freedom from the clutches of your battery, granting you the power to transcend the limitations of laborious lawn care. So, let us set forth on this extraordinary quest, unlocking the secrets of disconnection with grace and poise.
Disconnecting the Lawn Mower Battery: A Step-by-Step Guide
To ensure your lawn mower battery is disconnected safely, follow these simple steps:
-
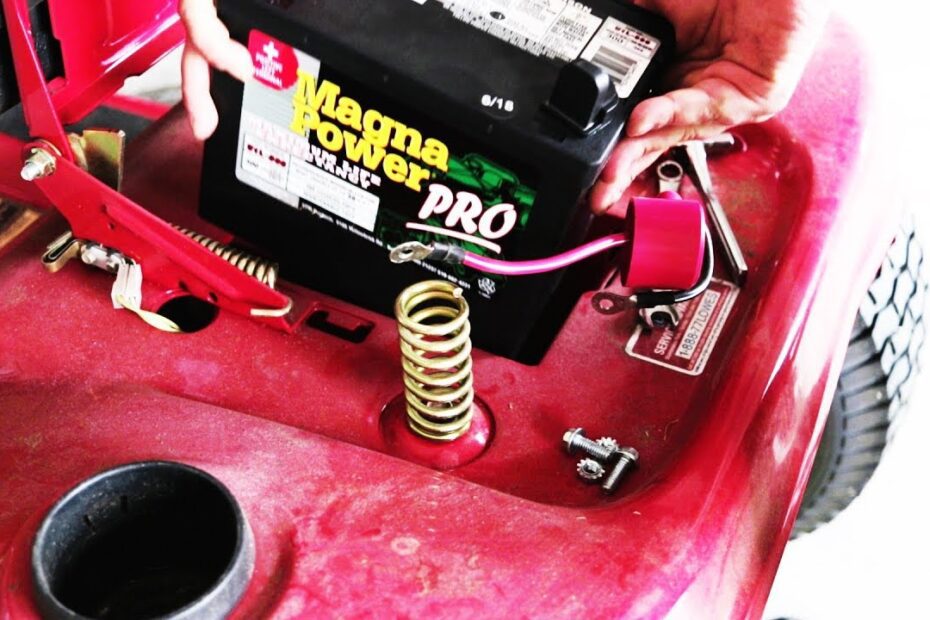
Locate the battery: Before starting, find the battery on your lawn mower. It is usually located under the hood or seat, but it may vary depending on the make and model of your mower. Look for a rectangular box with two cables attached to it.
-
Prepare for safety: Safety should always be a top priority. Before disconnecting the battery, put on a pair of gloves and safety goggles. This will protect your hands and eyes from any potential accidents or acid leaks.
-
Remove the negative cable: Using a wrench, loosen the nut on the negative cable and carefully remove it from the battery terminal. The negative cable is usually black and marked with a minus (-) sign. Set it aside, ensuring it doesn’t touch any metal surfaces.
-
Disconnect the positive cable: Similarly, loosen the nut on the positive cable and remove it from the battery terminal. The positive cable is usually red and marked with a plus (+) sign. Set it aside, away from any metal surfaces or the negative cable.
-
Secure the cables: To prevent accidental reconnection, wrap the disconnected cables with electrical tape or secure them with zip ties. This will ensure they stay in place and won’t interfere with other parts of the lawn mower.
-
Store the battery: If you are disconnecting the battery for storage purposes, make sure it is kept in a cool, dry place. Clean the battery terminals with a mixture of baking soda and water, then apply petroleum jelly to prevent corrosion.
In summary, following these steps will help you safely disconnect your lawn mower battery. Remember to prioritize safety and take precautions to avoid any mishaps. By properly disconnecting and storing your battery, you’ll ensure it stays in good condition for future use.
Table: Features and Tips
| Feature/Tips | Description |
|---|---|
| Safety First | Always wear gloves and safety goggles when working with batteries. |
| Regular Inspection | Regularly inspect the battery terminals for any signs of corrosion and clean them if necessary. |
| Secure Connections | Make sure the battery cables are securely connected to prevent any electrical faults. |
To disconnect the battery, follow these steps:

- Locate the battery compartment: Most lawn mowers have the battery situated under the seat or hood. Refer to your mower’s manual for specific instructions.
- Prepare your tools: Gather a pair of insulated gloves, safety glasses, and a wrench or pliers. These items will protect you from any potential electrical shocks.
- Switch off the mower: Ensure that the engine is turned off and remove the ignition key to prevent any accidents.
- Remove the battery cables: Using the wrench or pliers, loosen and remove the negative (-) cable first, followed by the positive (+) cable. Be cautious when handling the cables to avoid short circuits or sparks.
By following these steps, you successfully disconnect the battery, preventing any unwanted accidents or damage. Remember to exercise caution when reattaching the battery, ensuring the cables are securely fastened. Regularly checking and maintaining your mower’s battery will help keep your lawn lush and your machine in optimal condition.
Below is a helpful table outlining some additional features and tips on disconnecting the battery of your lawn mower:
| Features & Tips | Benefits |
|---|---|
| Wear Insulated Gloves | Protects against electrical shocks |
| Remove Ignition Key | Prevents unintentional startup |
| Properly Inspect Cables | Ensures no damage or corrosion |
Maintaining your lawn mower’s battery is a vital aspect of its overall longevity and performance. Remembering to disconnect the battery when necessary will help prevent any unnecessary electrical mishaps and prolong the life of your trusty mower. So, keep these essential steps in mind and stay safe while taking care of your lawn.
Taking Precautions to Safely Disconnect the Lawn Mower Battery
:
Disconnecting the battery of your lawn mower may seem like a simple task, but it’s important to take the necessary precautions to ensure your safety and prevent any potential accidents. Here are some steps to safely disconnect the lawn mower battery:
-
Safety first: Before you begin, make sure to put on safety gloves and goggles to protect yourself from any potential hazards. It’s better to be safe than sorry!
-
Locate the battery: Most lawn mower batteries are situated under the seat or behind a removable panel. Refer to your lawn mower’s user manual to find the exact location. Once located, carefully remove any covers or screws that may be securing the battery.
-
Disconnect the negative terminal: Using a wrench or socket set, loosen the nut on the negative terminal of the battery. Ensure that the negative terminal is wrapped with an insulating material, such as electrical tape, to prevent any accidental contact with the metal surface.
-
Disconnect the positive terminal: Next, loosen the nut on the positive terminal of the battery. Just like with the negative terminal, cover it with electrical tape as an extra precaution. Take care not to touch both terminals simultaneously, as it can cause a short circuit.
Remember, safety should always be your top priority when working with batteries. By following these precautions, you can safely disconnect your lawn mower battery without any unwanted mishaps.
Features/Tips Table:
| Features/Tips | Benefits |
|---|---|
| Wear safety gloves and goggles | Protects you from potential hazards |
| Locate battery | Easily find the battery’s position |
| Disconnect negative terminal | Prevents accidental contact with the metal surface |
| Disconnect positive terminal | Avoids short circuits |
| Double-check connections | Ensures proper disconnection |
| Store battery properly | Extends battery life |
First, ensure your lawn mower is turned off and the engine is completely cool. Safety should always be a top priority when working with batteries or any other machinery. Once you’ve done that, locate the battery. In most lawn mowers, the battery is typically located under the seat or in a compartment near the engine.
Next, grab a wrench or socket set that fits the battery terminals. Most lawn mower batteries have two terminals – a positive (+) and a negative (-). Identify these terminals and carefully loosen the nuts or bolts that are securing the battery cables. It’s important to start with the negative terminal first to avoid any accidental electrical sparks. Once both terminals are loosened, gently wiggle and pull the cables off the battery posts. Take note of which cable is connected to which terminal to ensure proper reconnection later on.
Now that you’ve successfully disconnected your lawn mower battery, here are some helpful features and tips to keep in mind:
| Feature/Tips | Description |
| Terminal Covers | Consider installing terminal covers on your battery’s terminals to protect them from corrosion and extend their lifespan. |
| Cleaning Battery Terminals | Periodically clean the battery terminals using a solution of baking soda and water to remove any built-up corrosion, ensuring optimal battery performance. |
| Battery Storage | If you’re storing your lawn mower for an extended period, it’s essential to remove the battery and store it separately in a dry, cool place to prevent potential damage. |
With these step-by-step instructions and helpful tips, disconnecting your lawn mower battery will be a breeze. Remember to always prioritize safety and take necessary precautions when working with batteries. Stay tuned for more informative guides on lawn mower maintenance and care.
Frequently Asked Questions
Q: Are you tired of being tethered to your lawn mower’s battery? We’ve got the answers you need to break free! Let’s dive into some quirky Q&A about how to disconnect that pesky lawn mower battery.
Q: Why should I bother disconnecting my lawn mower battery?
A: Ah, great question, my fellow grass enthusiast. Disconnecting the battery is like giving your mower its own little vacation. It not only prevents accidental starts but also ensures that your battery stays fresh and alive for seasons to come. So, be kind to your mower and give its battery some well-deserved R&R!
Q: Alright, enough chit-chat! How do I get started with the battery disconnect?
A: Hold your horses, eager mower owner! The first step is to locate the battery, which might be hiding under some well-manicured armor. Once you find it, make sure to put on your safety goggles because, you know, safety rocks! Then, cautiously loosen the negative terminal first, followed by the positive. Voilà, your lawn mower is now one step closer to complete freedom!
Q: Is it really that simple? I feel like there’s more to it!
A: Oh, the skeptics! Fear not, for it truly is a simple process, my friend. However, we must remind you to handle the battery with care and respect. Remember to remove any metallic rings or bracelets before carrying out this mission, as we don’t want you to experience any shocking surprises. And hey, if you’re ever in doubt, don’t hesitate to consult your trusty lawn mower manual or, better yet, seek the assistance of a professional. Safety first, always!
So, there you have it, dear lawn mower aficionado! Disconnecting your mower’s battery is as easy as taking a stroll through a freshly cut grass field. Enjoy the freedom and let your mower bask in the glory of its newfound battery-less existence! As we wrap up this guide on how to disconnect your lawn mower battery, take a moment to appreciate the small victories of maintaining your cherished piece of outdoor machinery. Disconnecting the battery may seem like a mundane task, but it is an essential step in ensuring the longevity and reliability of your trusty mower. Remember, dear readers, the satisfaction lies not only in the final snip of a perfectly trimmed lawn, but in the knowledge that you have mastered the inner workings of this mechanical beast.
Now equipped with the knowledge of the different types of batteries and their locations, their cozy connections and the safety precautions to take, you possess the power to safeguard your mower against unexpected mishaps. By detaching the battery with grace, you are effectively severing the ties that hold together the heart of this mighty machine, granting it a well-deserved rest when the mowing season comes to a close.
In this world consumed by our ever-connected lives, it is reassuring to disconnect, to savor the peace that nature offers, to abandon ourselves to the serenity that only a silent, motionless lawn mower can provide. Take a moment to marvel at the intricate parts and mechanisms that come alive with each pull of the starter cord, to appreciate the symbiotic relationship between man and machine, and to revel in the simple joys of a well-maintained lawn.
And so, dear green-thumbed comrades, we bid you farewell on this journey of battery detachment. May your lawns always be lush, your mowers forever reliable, and your disconnections, oh so smooth. Remember, the key to a thriving lawn lies not only in the power of your mower, but in the wisdom and care with which you navigate through each aspect of its upkeep. Happy disconnecting, and here’s to many future blissful moments of solitude amidst the green oasis of your dreams.

- When to Put Weed and Feed on Lawn in Michigan - October 16, 2023
- When to Fertilize Potatoes Plants - October 16, 2023
- Can You Plant Clover in the Spring - October 16, 2023