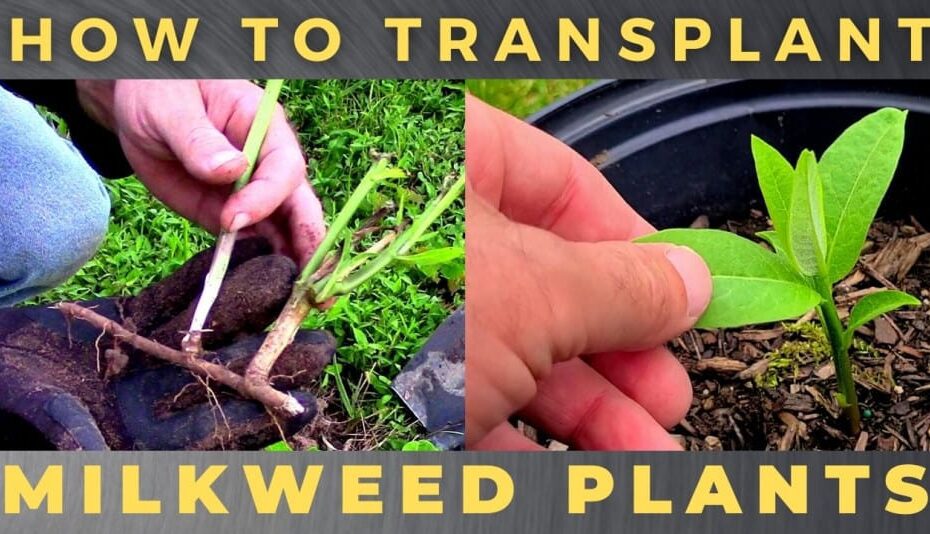
Unearthing the secrets of nature’s hidden treasure troves can be an exhilarating endeavor. Among the countless gems that await our discovery lies the remarkable milkweed plant, a humble herbaceous perennial that embodies both beauty and grace. With its delicate clusters of ethereal flowers and its profound ecological significance, milkweed has captivated the hearts and imagination of nature enthusiasts and conservationists alike. If you have ever found yourself yearning to unlock the secrets of this extraordinary plant, fear not, for we stand on the precipice of an enlightening journey together. In this peculiar quest, we shall delve into the art of digging up milkweed, an age-old practice that can cultivate a deeper understanding of this enigmatic botanical marvel. Join us as we explore the realm of milkweed’s intricate root system, unravel its mysteries, and pave the way for a fruitful relationship with this green wonder of nature.

When it comes to digging up milkweed, timing and the right tools are crucial for a successful extraction. Whether you’re a seasoned gardener or a beginner, these tips will help you dig up milkweed efficiently and ensure the survival of this beautiful plant.
Timing
Timing is everything when it comes to digging up milkweed. The best time to do this is in the early spring, just as the ground begins to thaw.
Here are a few indicators that will help you determine the optimal time to dig up milkweed:
- Look for new growth: Wait until you start to see new shoots emerging from the soil. This is a good sign that the plant has come out of winter dormancy and is preparing for the growing season.
- Check the soil temperature: Use a soil thermometer to measure the temperature. Milkweed typically thrives in soil that is around 60°F (15°C).
- Observe the weather: Plan your extraction on a day when the weather is mild and there is no risk of frost. This will ensure that the plant will not experience any shock during the transplantation process.
Tools
Having the right tools can make a world of difference when it comes to digging up milkweed without damaging the plant or its delicate root system. Here are some essential tools to have:
- Garden spade: Choose a sturdy garden spade with a sharp, flat blade. This tool will be your main instrument for loosening the soil and lifting the milkweed plant.
- Garden fork: A garden fork with sturdy tines can help you gently loosen the soil around the plant’s root system without causing damage.
- Pruning shears: Keep a pair of pruning shears handy to remove any dead or damaged parts of the plant before extraction.
- Planting container: Prepare a planting container filled with soil or potting mix to temporarily house the milkweed until it can be transplanted to its new location.
| Feature/Tips |
Explanation |
| Proper Soil Moisture |
Maintain adequate moisture in the soil to ensure successful transplantation. |
| Root Preservation |
Be careful not to damage the plant’s roots during the extraction process to ensure its survival. |
| Labeling |
Label the extracted milkweed plants to keep track of different varieties or species. |

Loading... Seconds Left for
Miniature Orchid Terrarium Gallery!

Choosing the Perfect Spot: Identifying Ideal Growing Conditions for Milkweed
When it comes to cultivating milkweed, selecting the perfect spot for your plants is key to their successful growth. Identifying the ideal growing conditions for milkweed ensures that these beautiful and essential plants thrive in your garden. Let’s explore some valuable features and tips that will help you choose the perfect spot for your milkweed.
| Feature |
Tips |
| Sunlight |
Choose a location that receives at least 6 hours of direct sunlight per day. |
| Soil |
Ensure the soil is well-draining and rich in organic matter. Loamy soil with a pH between 6 and 7 is ideal. |
| Spacing |
Allow enough space between milkweed plants to prevent overcrowding, as it can lead to increased susceptibility to diseases. |
Additionally, milkweed plants are highly attractive to pollinators, especially monarch butterflies. To create an environment that supports these magnificent creatures, consider planting milkweed near other nectar-rich flowers. Be mindful of providing a water source nearby, such as a shallow basin filled with pebbles and water, to fulfill the hydration needs of both milkweed and visiting pollinators.

So, you’ve decided to master the art of milkweed extraction. Look no further! In this step-by-step guide, we will walk you through the process of safely uprooting this fascinating plant.
Procedure:
- Begin by identifying a mature milkweed plant. Look for its distinctive broad leaves and peculiarly shaped flowers.
- Wear gardening gloves to protect your hands, as some species of milkweed can cause skin irritation.
- Take a sturdy garden spade and dig a wide circle around the base of the milkweed, ensuring you capture as much of the root system as possible.
- Carefully loosen the soil around the plant, removing any rocks or debris that may impede the extraction.
- Once the soil is loosened, gently grasp the stem near the base and rock it back and forth, easing the plant out of the ground along with its roots.
- Inspect the root system to ensure it is intact. If any roots have broken off, use pruning shears to remove any damaged parts.
- Transplant the milkweed to its new location immediately, ensuring it is placed at the same depth as it was originally planted.
- Water the newly transplanted milkweed thoroughly, providing enough moisture to establish its roots in its new environment.
Maste
ring the art of milkweed extraction requires patience and precision. By following these steps, you can safely uproot and transplant milkweed, allowing you to contribute to the growth of these vital plants and support the butterfly populations that rely on them.
| Features |
Tips |
| Broad leaves |
Identify milkweed by its unique foliage. |
| Peculiar flowers |
Look for the distinct shape and color of milkweed flowers. |
| Protective gloves |
Wearing gloves prevents potential skin irritation. |
Ensuring Milkweed Survival: Proper Transplanting Techniques for a Thriving Garden Addition
Digging up milkweed can be an essential step in ensuring its survival and thriving in your garden. By following proper transplanting techniques, you can effectively move milkweed plants without causing harm and give them the best chance to establish themselves. Here are some tips to help you dig up milkweed successfully:
-
T
iming is crucial: The best time to dig up milkweed is in early spring or late fall when the plants are dormant. This minimizes stress on the plants and increases the chances of successful transplantation.
-
Prepare the new location: Before digging up the milkweed, make sure you have a suitable spot ready for its relocation. Consider factors such as sunlight, soil quality, and available space. Milkweed thrives in well-drained soil with plenty of sunlight, so choose a location that meets these requirements.
able>
| Features |
Tips |
| Well-drained soil |
Ensure the new location has soil that drains well to prevent standing water around the milkweed roots. |
| Full sunlight |
Select a spot where the milkweed will receive at least 6 hours of direct sunlight each day to promote healthy growth. |
| Spacing |
Provide enough space between milkweed plants to allow for their mature size and prevent overcrowding. |
-
Digging up the milkweed: Start by gently loosening the soil around the milkweed using a garden fork or shovel. Be careful not to damage the roots. Gradually work your way around the plant until you can lift it out of the ground with the root system intact.
-
Transp
lanting: Once you have carefully removed the milkweed from its original spot, immediately place it in the prepared hole in the new location. Ensure that the hole is deep and wide enough to accommodate the entire root system without crowding. Backfill the hole with soil, gently firming it around the roots.
By following these proper transplanting techniques, you can increase the chances of a successful milkweed relocation, allowing the plant to thrive and contribute to the survival of this vital species. Remember to provide regular water and ongoing care to support the establishment and growth of your transplanted milkweed.
pan id="Frequently_Asked_Questions">Frequently Asked Questions
Q: Are there any magical tricks to dig up milkweed effortlessly?
A: While milkweed may not reveal any secret incantations, a few tips can certainly ease your digging journey.
Q: Is there a specific time of the year that’s perfect for digging up milkweed?
A: Timing is everything! The best time to dig up milkweed is during the early spring or late fall when the plant is dormant.
Q: How can I master the art of digging up milkweed without damaging its delicate roots?
A: Patience and precision are key! Gently loosen the soil around the milkweed plant, extending your digging efforts beyond its immediate root system. Carefully lift the plant with as much soil intact as possible, ensuring you’ve given it the sweetest chance for success. As we unearth the final chapter of our endeavor to uncover the mystique surrounding milkweed, we bid adieu. With shovels in hand and dirt on our knees, we have embarked on a journey deep beneath the surface, unearthing the secrets that this humble plant holds.
From its el
usive underground roots to the resplendent crown of vibrant green, milkweed has mesmerized us with its intriguing nature. As we conclude our exploration on how to dig up milkweed, we hope to have empowered you with the knowledge to embark on your own botanical quest.
Remember, dear readers, the careful art of excavation is imperative when treading upon the home of milkweed. Delicately separate the soil, revealing the tender rhizomes that lie in wait. The patience, the precision, the respect—these are the hallmarks of an aspiring milkweed archaeologist.
As you venture forth with your trusty trowel, remember the symbiotic relationship that blossoms between you and the milkweed. Each disturbance of the soil creates an opportunity for new growth, an intricate dance of survival between human and plant. You have become the guardian of this native treasure, entrusted with its propagation and preservation.
And so, ami
dst the whispers of the wind and the serenade of nature’s chorus, we uncover the final treasures buried within our knowledge of milkweed’s subterranean realm. With this newfound understanding, you pave the way towards a flourishing habitat, inviting monarch butterflies and other pollinators to dance amidst a sea of nectar-filled blooms.
As we bid you farewell, our hearts swell with gratitude for your dedication to the natural world. May your endeavors in unearthing milkweed be fruitful, embodying the unyielding spirit of curiosity that binds us all. Until we meet again, keep digging, dear friends, for the secrets of the earth are waiting to be discovered, one milkweed at a time.
Hello! I'm Jessica Owen, an avid gardener and proud contributor to Up-Gardening.com. Gardening is my passion, and I'm delighted to share my green-thumb experiences with you. From planting tips to nurturing blooms, I'm here to help you cultivate your own slice of paradise. Let's grow together in the garden!
Latest posts by Jessica Owen
(see all)


